
Workspace
Customer Conversations
Follow every customer conversation from all channels, join conversations, leave internal notes and see customer details.
Customer Conversations (محادثة العميل) is your team's shared inbox. Conversations from every channel (Web, WhatsApp…) arrive here: you read what passes between the customer and your AI Agent, join the conversation when you need to step in, leave internal notes for your teammates, and see conversation and customer details in a side panel.
How to open it
In the sidebar, open Workspace (مساحة العمل) and choose Customer Conversations (محادثة العميل).
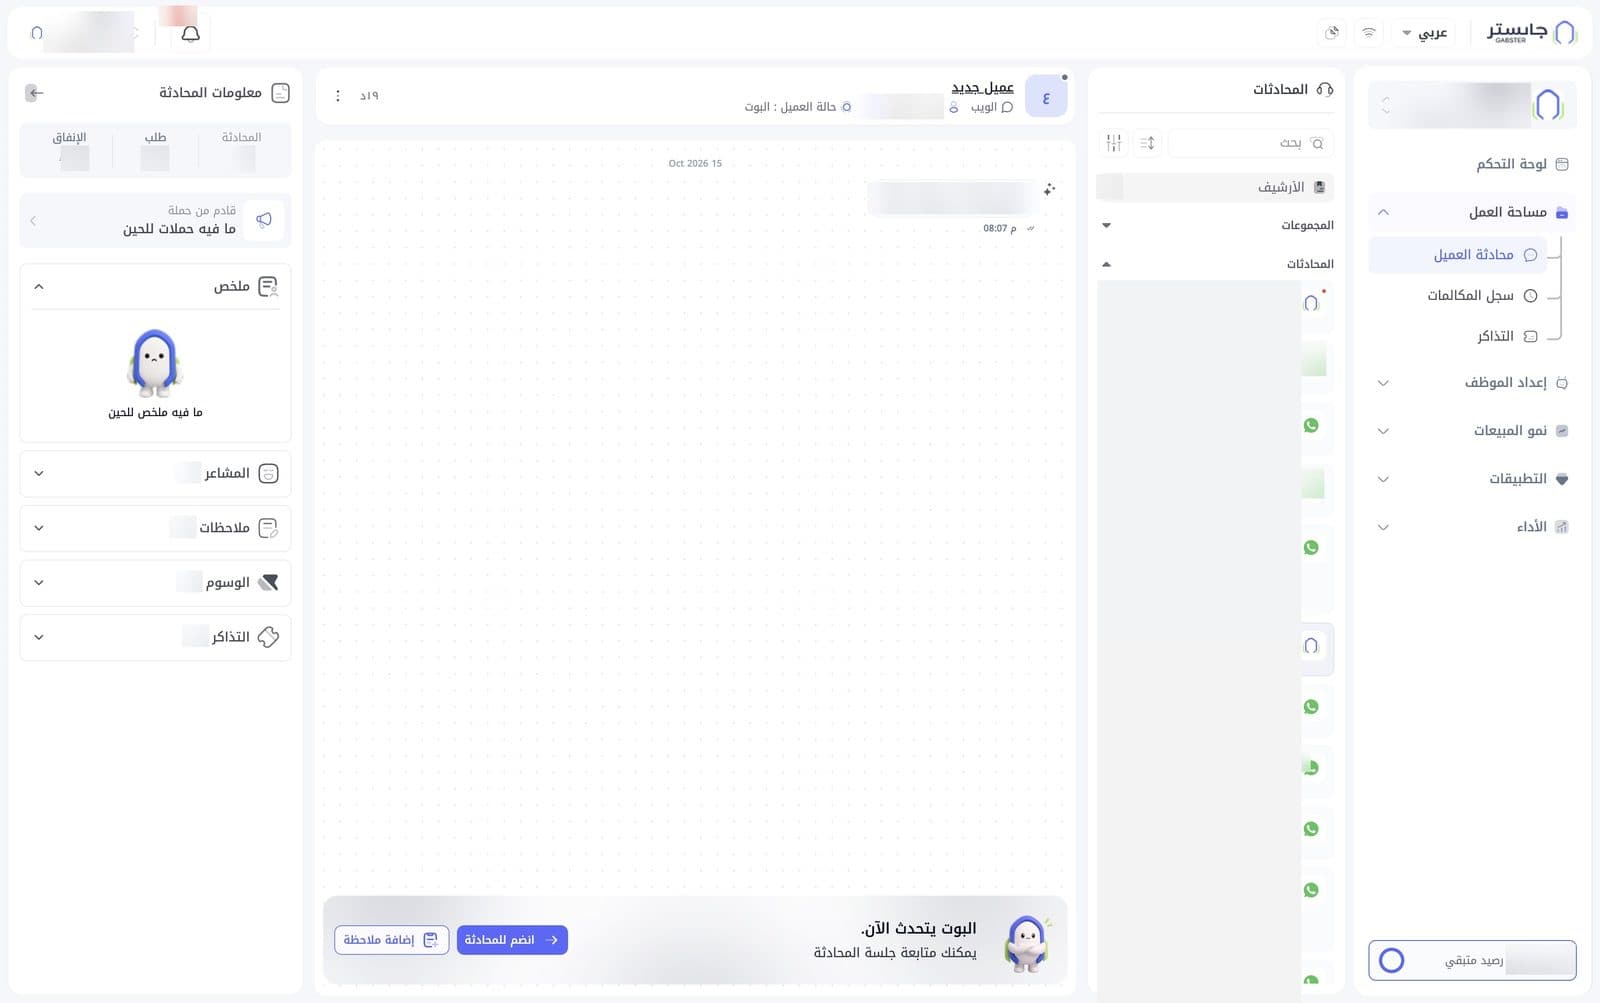
The page has three parts, from right to left: the conversation list, the selected conversation with its header, and the Conversation info (معلومات المحادثة) panel.
When no conversation is selected, the middle area only shows Select a conversation (اختر محادثة) and the info panel is hidden.
Conversation list
The list is titled Conversations (المحادثات). Its toolbar holds:
- The Filters icon (sliders): opens the Filters panel. See "Filters" below.
- The Sort icon (up and down arrows): opens the sort menu. See "Sort the list" below.
- The Search (بحث) field: type a customer's name to find their conversations. Website chats from visitors with no saved name are titled New customer (عميل جديد).
Below the toolbar:
- The Archive (الأرشيف) row, with the number of archived conversations.
- In some projects, two collapsible headers: Groups (المجموعات) and Conversations (المحادثات).
Conversation item
Each conversation has an item in the list:
| Element | What it shows |
|---|---|
| Channel icon | The WhatsApp logo for WhatsApp conversations, the Gabster logo for Web conversations |
| Red dot | Appears on the icon's corner to flag some conversations |
| Name | The customer's name, phone number, or New customer (عميل جديد) when the name is unknown |
| Time | Time since the last activity, with a unit letter: ث seconds, د minutes, ي days |
| Last message | A preview of the last message, after a sender icon: ✦ for the AI Agent, a person icon for a human. Attachments show as ملف (file) |
| Chips | A blue megaphone chip for the campaign the conversation came from, an orange chip for a tag, and a + count for further chips |
Click an item to open the conversation: the item gets a blue border and the messages and info panel load.
Conversation menu
Hover over an item to reveal its ⋮ icon, then click it to see the actions:
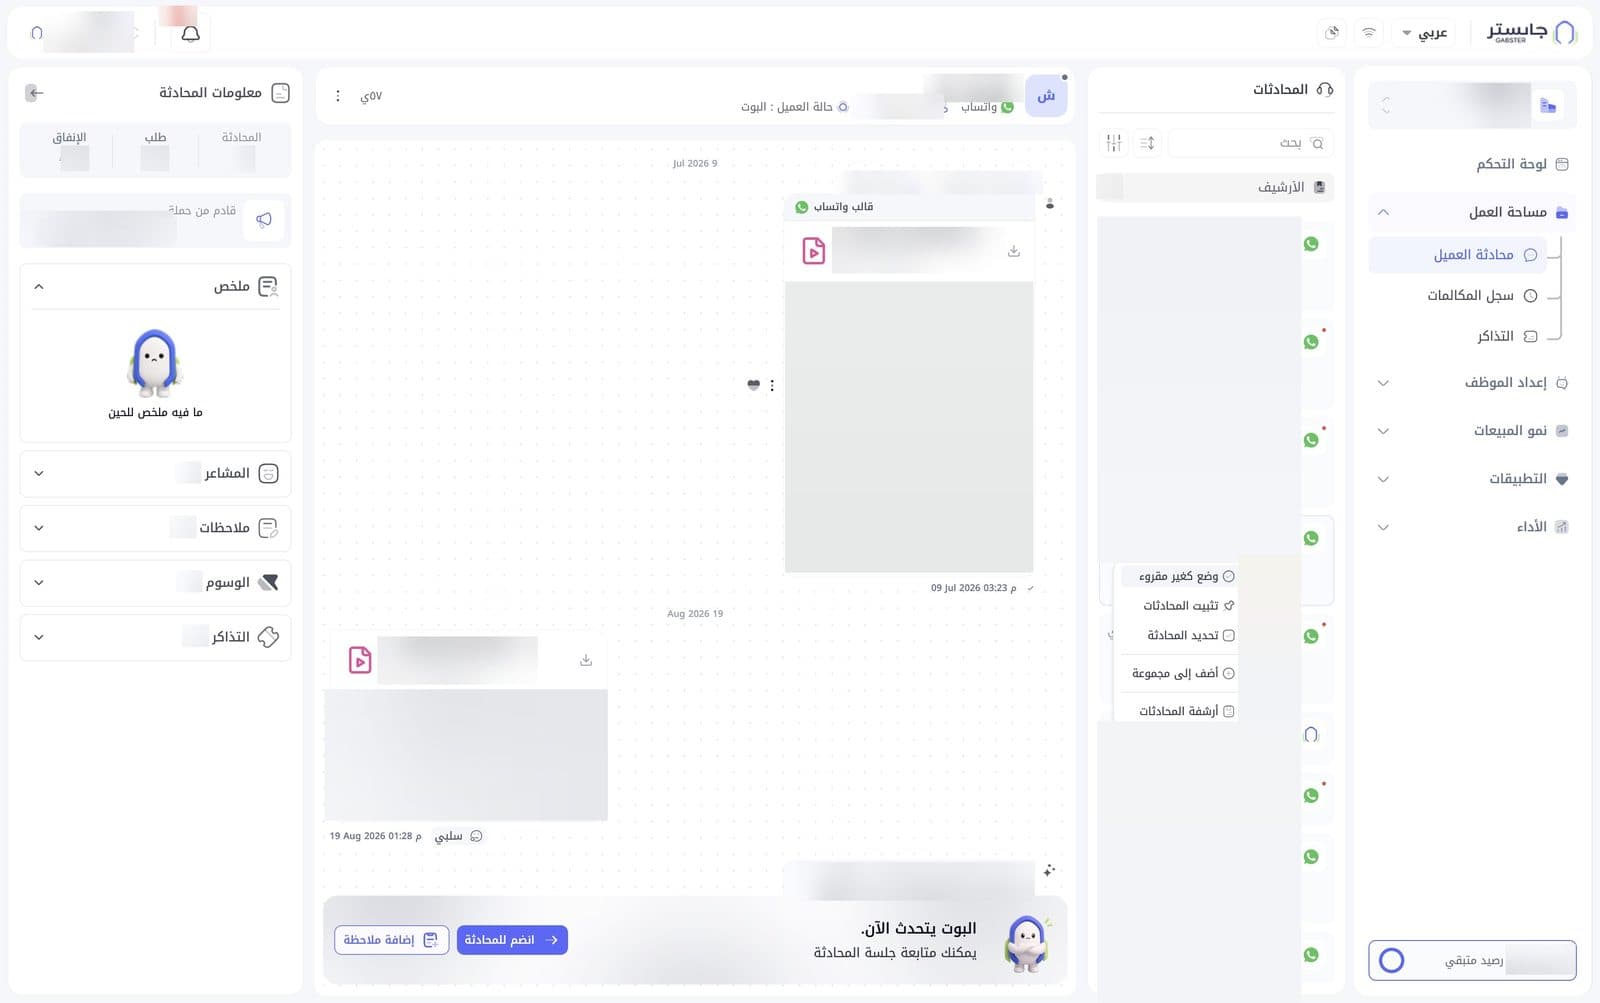
- Mark as unread (وضع كغير مقروء)
- Pin conversation (تثبيت المحادثات)
- Select conversation (تحديد المحادثة)
- Add to group (أضف إلى مجموعة)
- Archive conversation (أرشفة المحادثات)
Sort the list
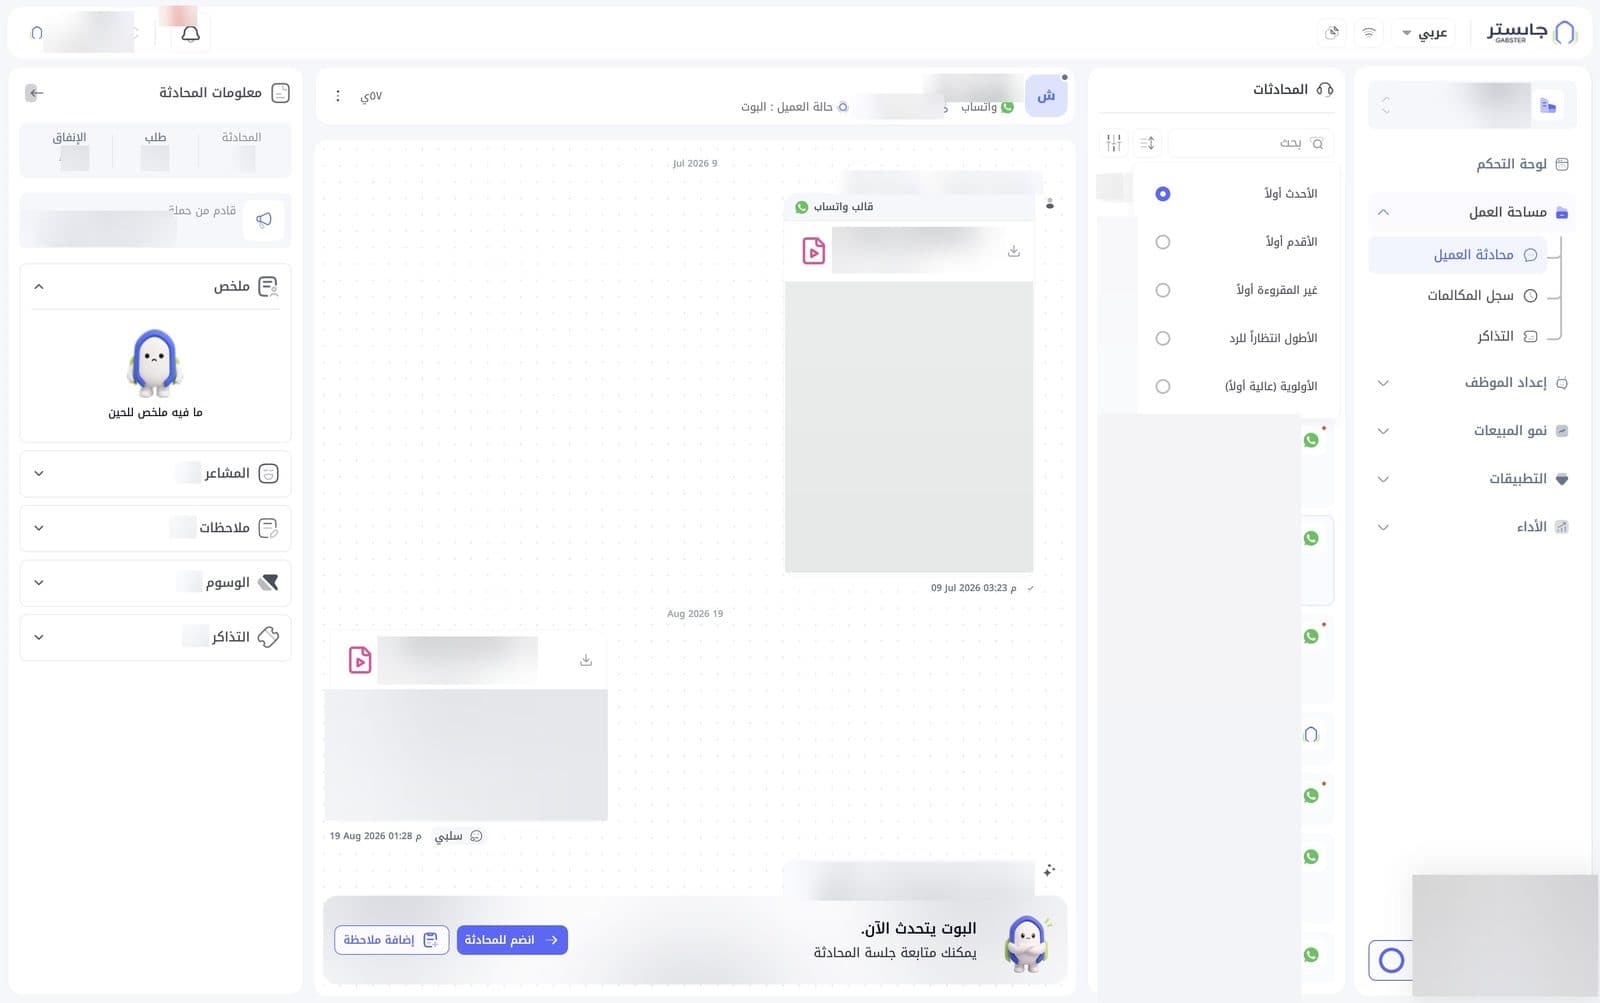
Click the sort icon and choose one order:
- Newest first (الأحدث أولاً) — the default
- Oldest first (الأقدم أولاً)
- Unread first (غير المقروءة أولاً)
- Longest waiting for reply (الأطول انتظاراً للرد)
- Priority (high first) (الأولوية (عالية أولاً))
Filters
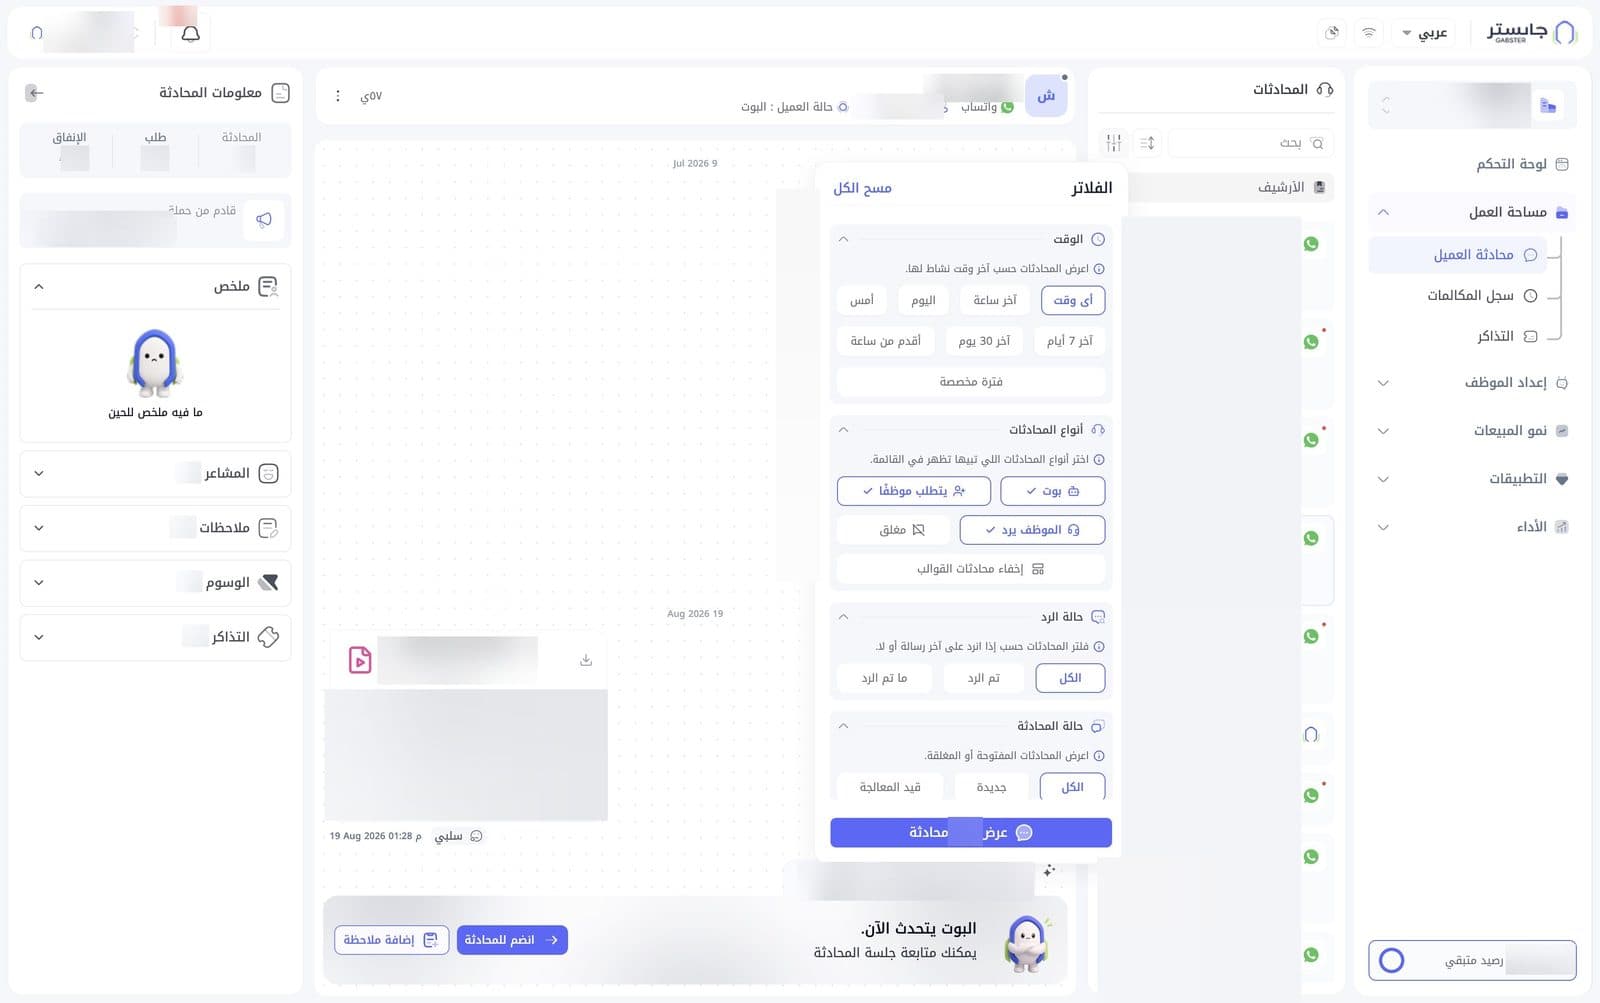
The filters icon opens the Filters (الفلاتر) panel over the conversation. It has four collapsible groups and, at the bottom, a button showing how many conversations match, in the form Show … conversations (عرض … محادثة).
| Group | Options | Selection |
|---|---|---|
| Time (الوقت) — by the conversation's last activity | Any time (أى وقت, default), Last hour (آخر ساعة), Today (اليوم), Yesterday (أمس), Last 7 days (آخر 7 أيام), Last 30 days (آخر 30 يوم), Older than an hour (أقدم من ساعة), Custom period (فترة مخصصة) | One option |
| Conversation types (أنواع المحادثات) | AI Agent (بوت), Needs staff (يتطلب موظفًا), Staff replying (الموظف يرد), Closed (مغلق), Hide WhatsApp template conversations (إخفاء محادثات القوالب) | Several options: click one to turn it on or off |
| Reply status (حالة الرد) — whether the last message was replied to | All (الكل, default), Replied (تم الرد), Not replied (ما تم الرد) | One option |
| Conversation status (حالة المحادثة) — open or closed conversations | All (الكل, default), New (جديدة), In progress (قيد المعالجة), and more options further down the panel | One option |
Under Conversation types, AI Agent, Needs staff and Staff replying are on by default, while Closed is off. Closed conversations therefore stay out of the list until you turn that option on.
- Clear all (مسح الكل): a link at the top of the panel that resets your choices.
- The Show … conversations button: its number updates as you change your choices, so you see how many conversations match before you apply them. Click it to show those conversations.
Conversation header
The top of an open conversation shows:
- The customer name (underlined): click it to open the Customer card (see below).
- The channel, such as Web (الويب) or WhatsApp (واتساب).
- The staff member assigned to the conversation, with an extra + count beside it.
- Customer status (حالة العميل), such as AI Agent (البوت) while the AI Agent is handling the conversation, or Waiting for staff (بانتظار موظف) when the conversation is waiting for a staff member.
- The time since the last activity.
- A ⋮ icon for the conversation actions menu.
Conversation actions menu (⋮)
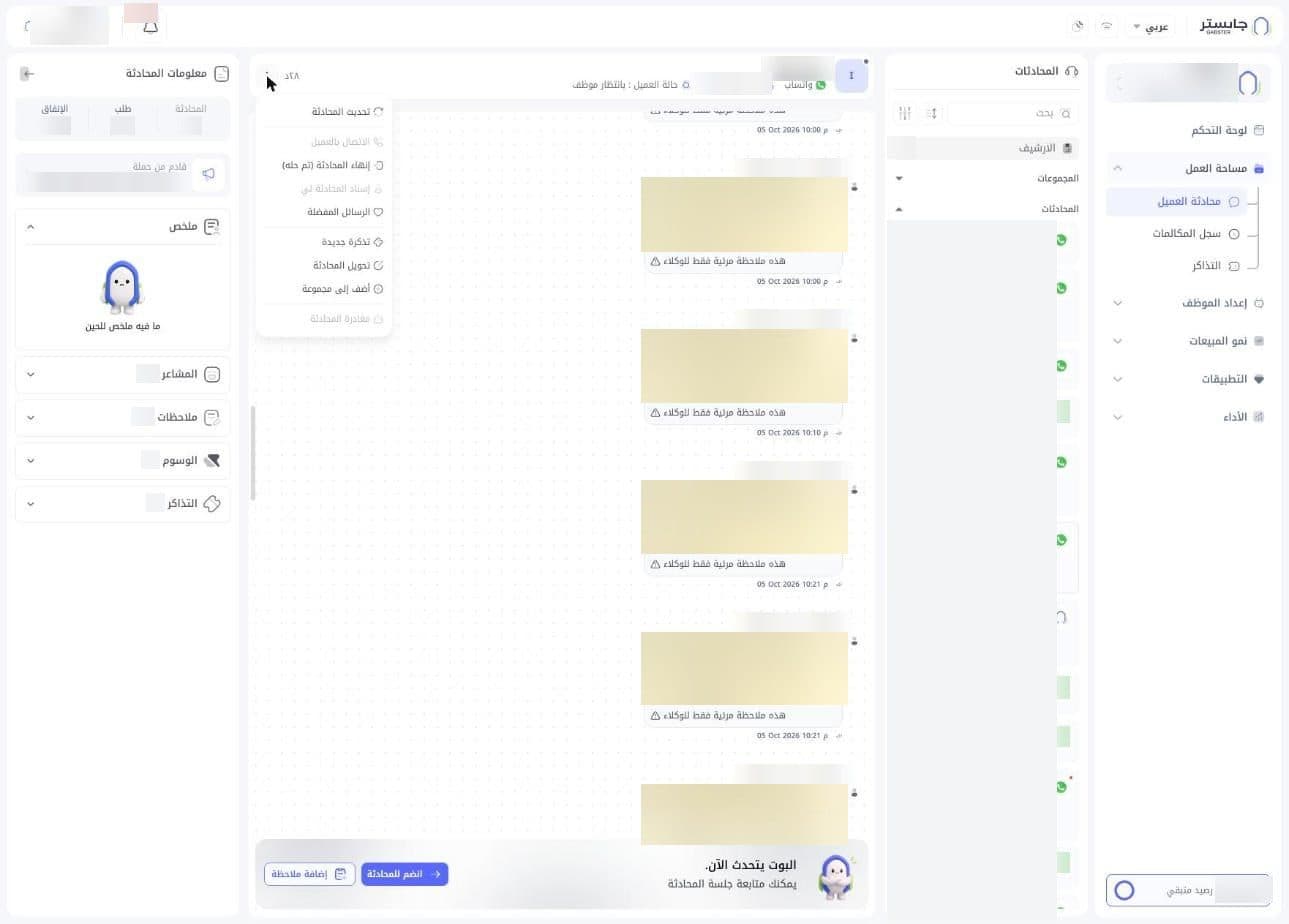
| Action | Use it to |
|---|---|
| Refresh conversation (تحديث المحادثة) | Reload the conversation |
| Call customer (الاتصال بالعميل) | Phone the customer |
| End conversation (resolved) (إنهاء المحادثة (تم حله)) | End the conversation once the customer's request is resolved |
| Assign conversation to me (إسناد المحادثة لي) | Assign the conversation to yourself |
| Favourite messages (الرسائل المفضلة) | See the messages marked as favourites |
| New ticket (تذكرة جديدة) | Open a new ticket from this conversation |
| Transfer conversation (تحويل المحادثة) | Hand the conversation over to someone else |
| Add to group (أضف إلى مجموعة) | Add the conversation to a group |
| Leave conversation (مغادرة المحادثة) | Leave a conversation you joined |
Some items can appear greyed out and unavailable: Leave conversation stays unavailable until you have joined the conversation, and on website chat conversations Call customer and Assign conversation to me are unavailable.
End a conversation as resolved
- Choose End conversation (resolved) (إنهاء المحادثة (تم حله)) from the ⋮ menu. A form opens.
- Describe the fix in Solution description (وصف الحل). The form also has an Auto-fill with AI (الملء التلقائي بالذكاء الاصطناعي) button.
- If you like, add photos in Damaged part (الجزء التالف) and Replacement part (الجزء المستبدل): JPG, PNG or WEBP.
- Click Resolved (تم الحل).
A window says Great work! … (شغل رهيب! …) with Next conversation (المحادثة التالية) and Undo (تراجع عن الخطوة). The thread shows All staff left the conversation (غادر جميع الموظفين المحادثة), and the conversation leaves the All (الكل) list.
Messages
Messages appear under date separators:
- AI Agent messages on the right, with a ✦ icon beside them and the time and delivery tick below.
- Outgoing staff messages, also on the right, with the staff member's name and team above them. WhatsApp template (قالب واتساب) messages carry that header at the top.
- Customer messages on the left. Each text message has a Sentiment chip under it, such as Neutral (محايد), Negative (سلبي) or Very negative (سلبي جداً).
- Attachments show as a card with the file name, type, size and a download icon.
A heart icon and a ⋮ icon can appear beside a message.
When the AI Agent is talking
While your AI Agent is handling a conversation, there is no text box. Instead, a banner reads AI Agent is talking now (البوت يتحدث الآن.) and You can follow the conversation session (يمكنك متابعة جلسة المحادثة), with two buttons:
- Join conversation (انضم للمحادثة): take over the conversation from the AI Agent and reply to the customer yourself.
- Add note (إضافة ملاحظة): write an internal note without joining the conversation.
Once you join, your AI Agent stops replying in this conversation, and the customer is told that a staff member joined:
- The header shows Customer status: Staff joined (حالة العميل : انضم موظف), and the thread shows the line Staff member … joined the conversation (انضم الموظف … إلى المحادثة).
- A reply box opens with Type your message here... (اكتب رسالتك هنا...) and the buttons Quick replies (ردود سريعة), Suggest a reply (اقتراح رد), Language and dialect (اللغة واللهجة) and Record (تسجيل). Once you type, Record becomes Send (إرسال).
To hand the conversation back, choose Leave conversation (مغادرة المحادثة) from the ⋮ menu. It asks Are you sure you want to leave the conversation? (متأكد تبي تطلع من المحادثة؟): click Leave (مغادرة), or Back (تراجع) to stay. When the last staff member leaves, the thread shows All staff left the conversation (غادر جميع الموظفين المحادثة) and Staff member … left the conversation (غادر الموظف … المحادثة), the AI Agent is talking now banner comes back, and the header status reads Closed (مغلقة). Your AI Agent answers the customer's next message.
The customer status can read Waiting for staff while the AI Agent is talking now banner is still shown. That means the customer needs a staff member: click Join conversation to take over.
Internal notes
Internal notes are messages staff write for each other inside a conversation. They appear as yellow bubbles on the right, with the author's name and team above them, and each one ends with This note is visible to staff only (هذه ملاحظة مرئية فقط للوكلاء) — the customer never sees it. Notes can mention teammates with @ followed by their name.
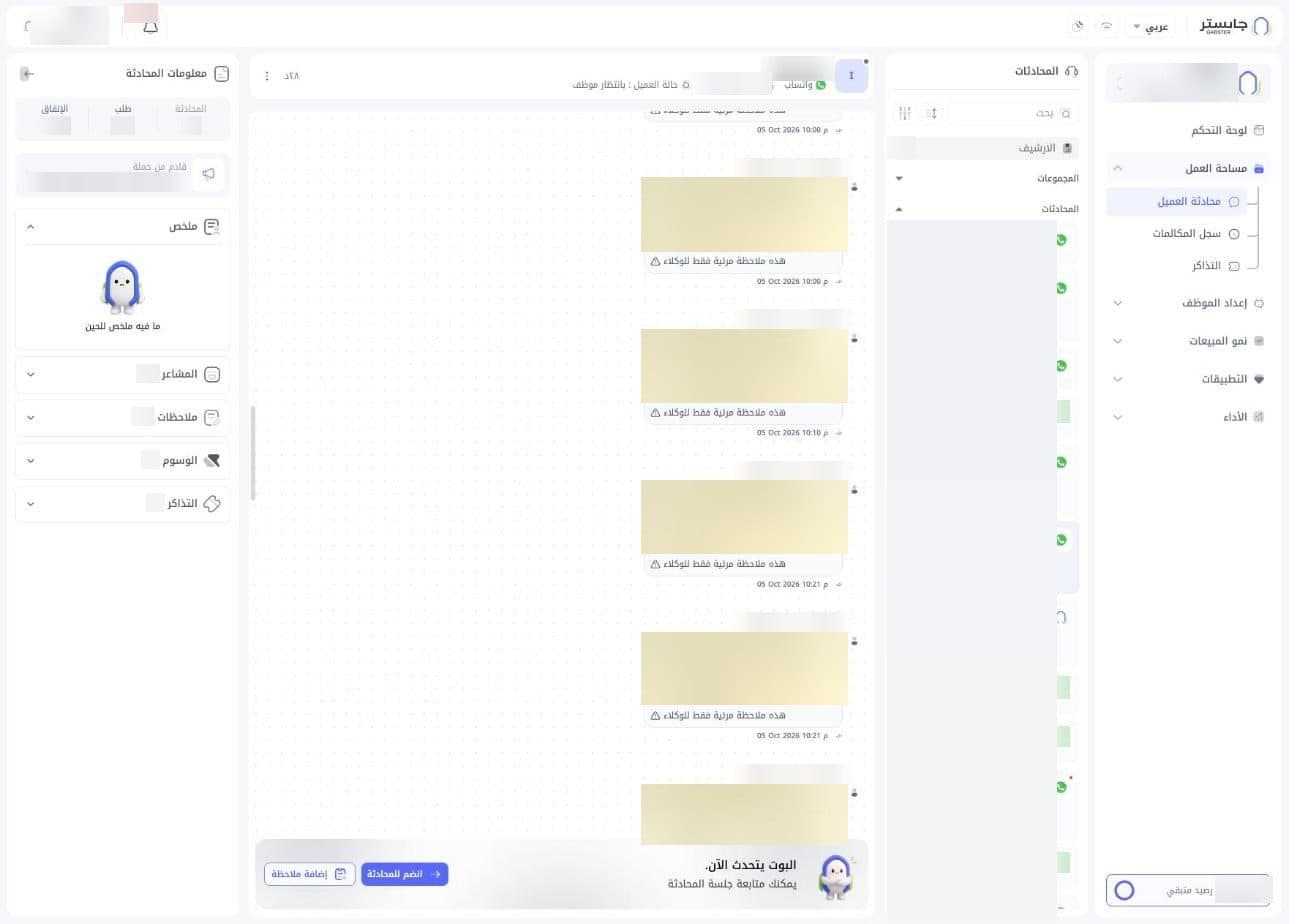
Add a note
- Open the conversation and click Add note (إضافة ملاحظة) below it.
- The Take a note (أخذ ملاحظة) window opens over the conversation. Type your note in the text area.
- Format the text if you like from the toolbar: bold, italic, underline, strikethrough, headings (H1, H2, H3), bulleted or numbered list, quote, alignment, link, undo and redo.
- Click Save (حفظ) to add the note, or Cancel (إلغاء) to leave without saving.
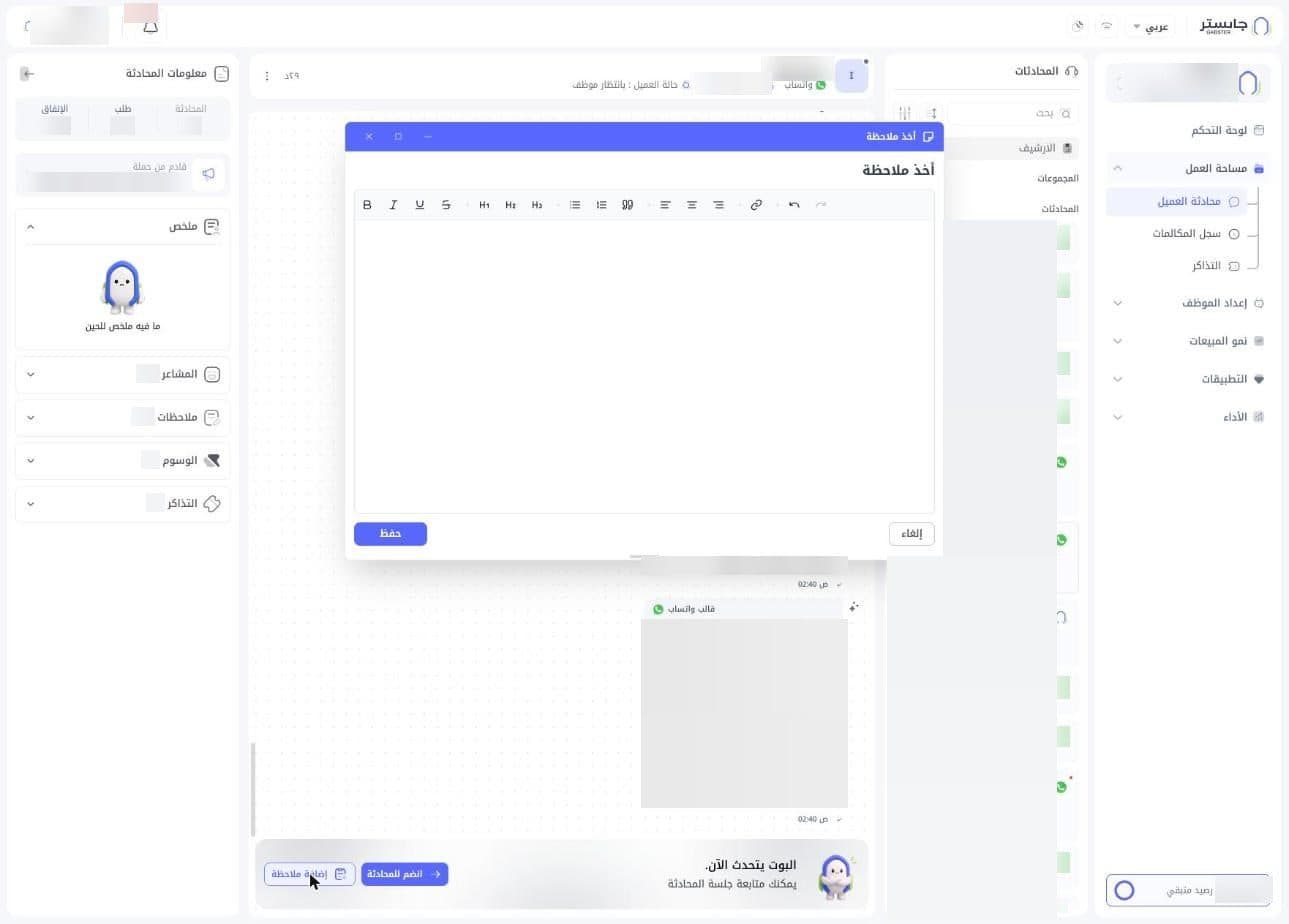
After Save, the note appears in the thread as a yellow bubble, and the Notes (ملاحظات) count in Conversation info goes up.
The window does not block the rest of the page: its blue title bar has minimise, maximise and close buttons, and there is a small grip at the bottom.
Conversation info
The left panel shows Conversation info (معلومات المحادثة), with an arrow button at its top.
At the top of the panel:
- Three figures about the customer: Conversations (المحادثة), Orders (طلب) and Spend (الإنفاق, in riyals).
- The Came from campaign (قادم من حملة) card: the campaign the customer came from, or a note that there are no campaigns yet.
Below are collapsible sections, each with a count except Summary. You can open several sections at the same time.
Summary
Summary (ملخص) is open by default. After the conversation is handed off to your team, it fills with an AI-written summary of the conversation. Until then it reads No summary yet (ما فيه ملخص للحين).
Sentiment
Sentiment (المشاعر) lists the conversation's messages with a sentiment score for each.
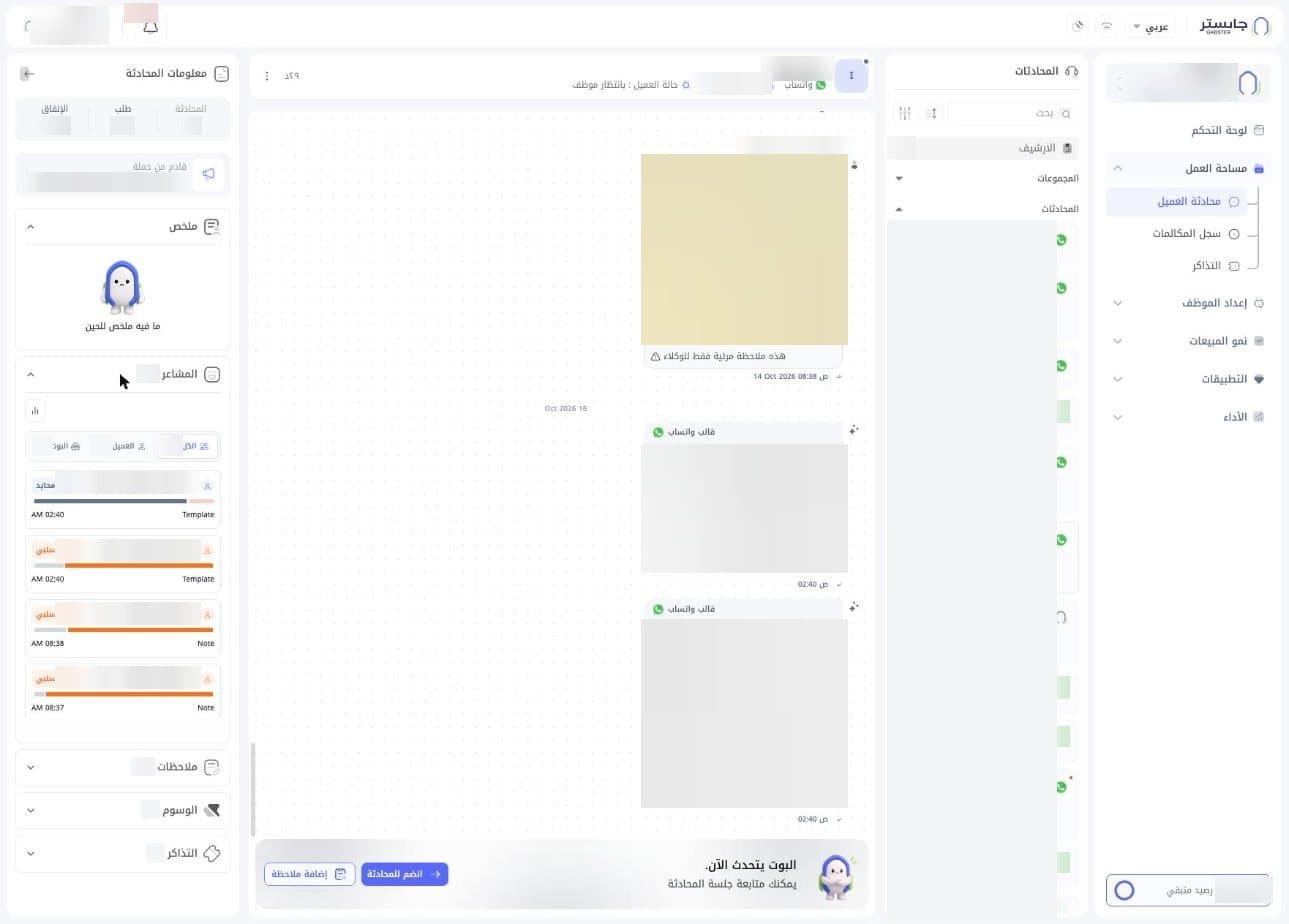
- Tabs All (الكل), Customer (العميل) and AI Agent (البوت), each with a message count.
- A card per message: sender icon, message preview, a chip with a score and label such as 3 - محايد (neutral) or 2 - سلبي (negative), a score bar, the time and the message type.
- A small chart button at the top of the section.
Notes
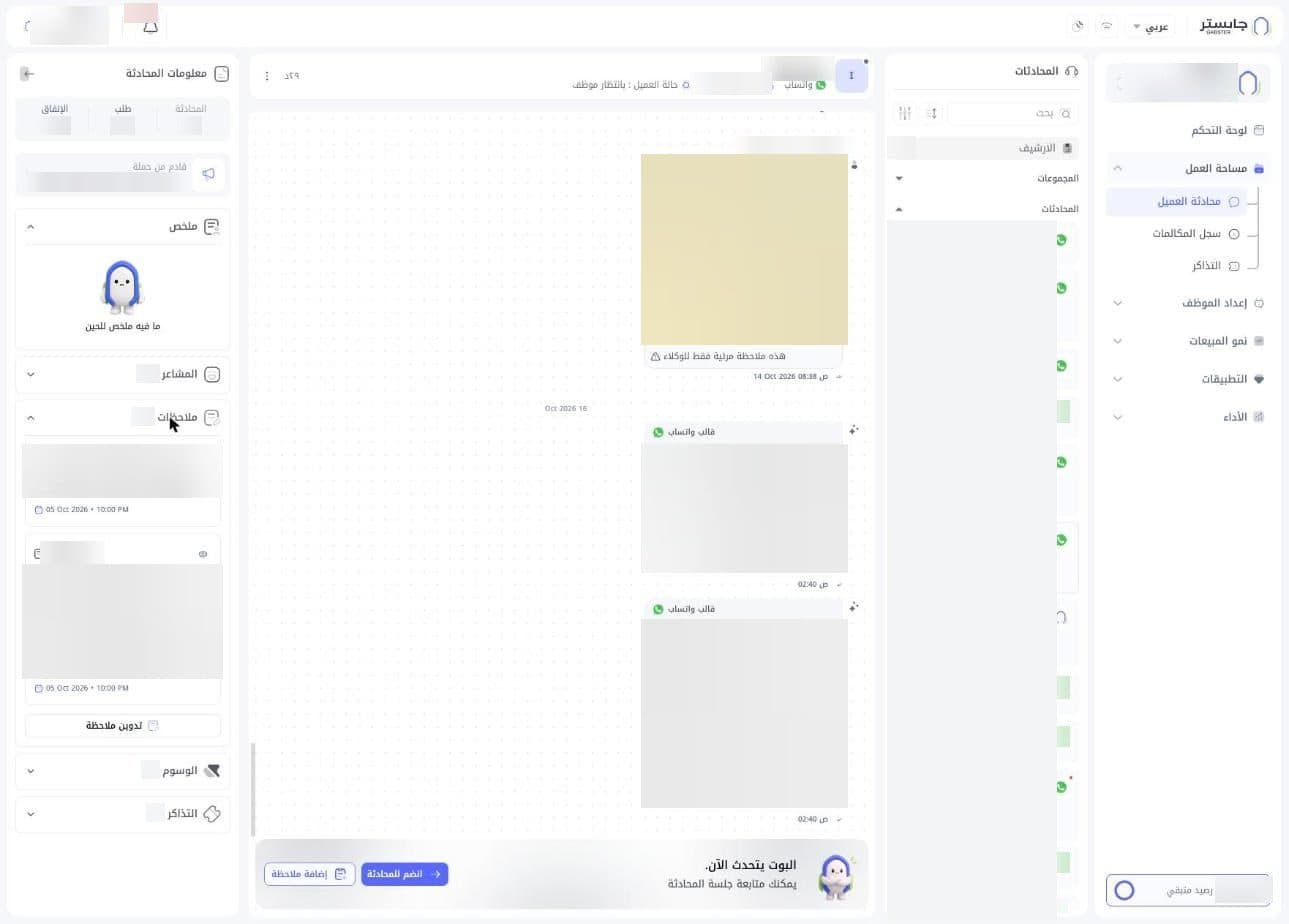
Notes (ملاحظات) collects all internal notes in the conversation. Each card shows the note text with its date and time, and can have a title and an eye icon. At the end of the section, Write a note (تدوين ملاحظة) starts a new note.
Tags
Tags (الوسوم) shows the tags on the conversation, each as a chip with a small circle icon. At the end of the section is Add tag (إضافة وسم). You manage the tags themselves on the Tags page.
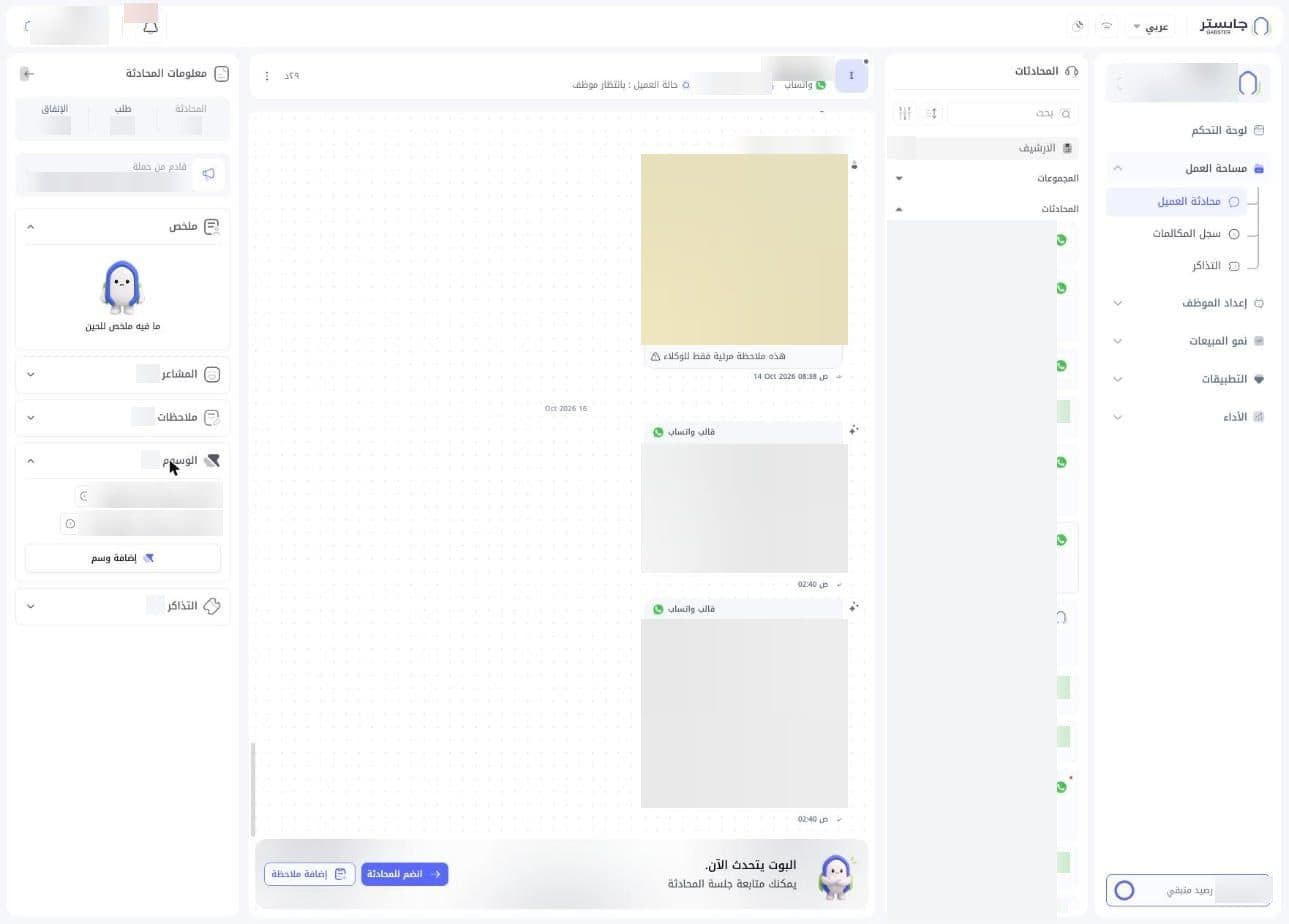
To add a tag: click Add tag (إضافة وسم). The Choose another tag (اختيار وسم آخر) picker opens with a Search tags (بحث عن وسوم) box. Tick the tags you want, then click Add tag (N) (إضافة وسم (N)). Each tag shows as a chip here and on the conversation's row in the list.
To create a tag on the spot: in the picker, click Create new tag (إنشاء وسم جديد). The Create tag (إنشاء تصنيفة) window asks for a Name (الاسم) and a Description (الوصف); click Create (إنشاء), or Close (إغلاق) to leave. A Tag created successfully (تم إنشاء التصنيفة بنجاح) message confirms it.
Tickets
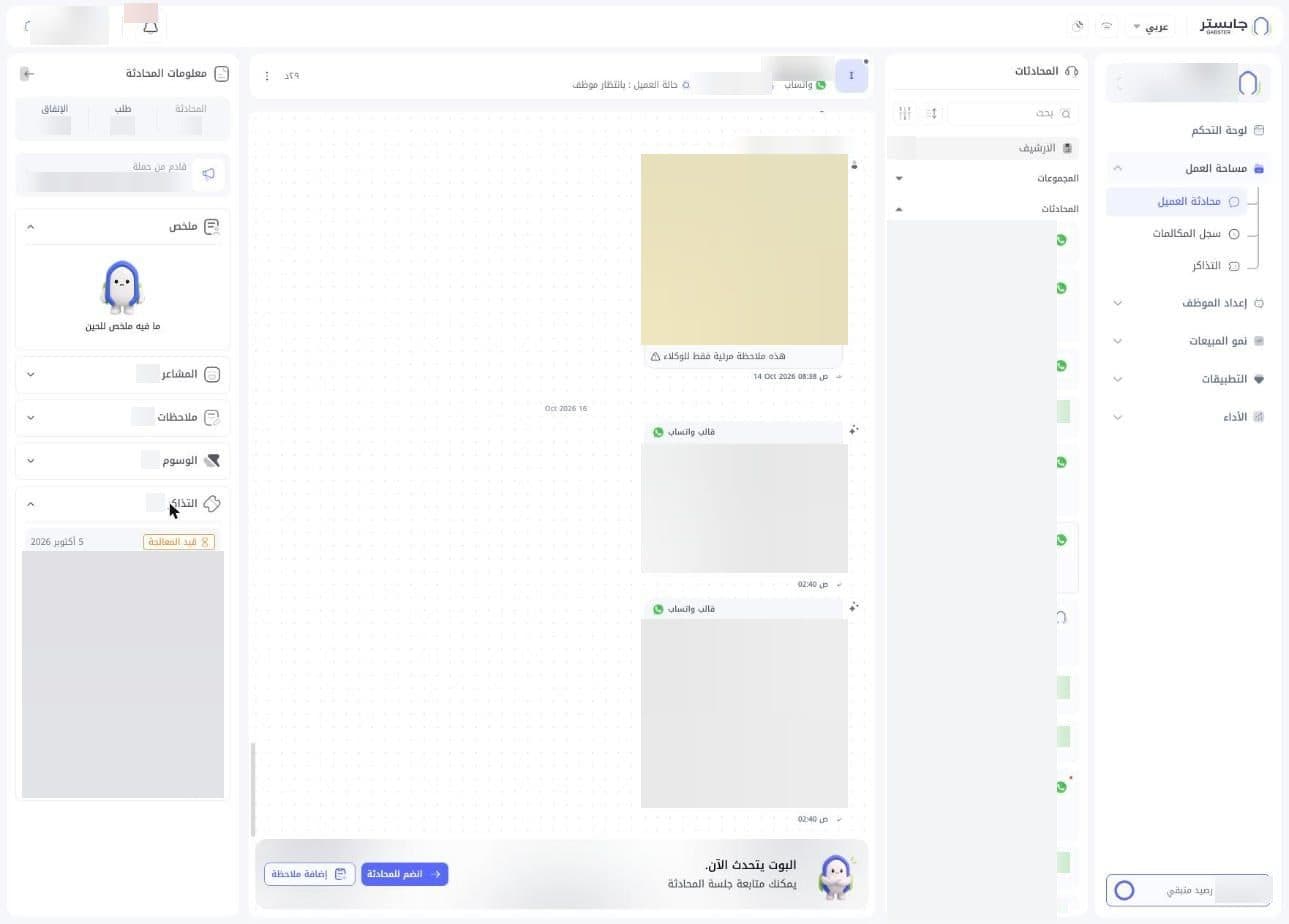
Tickets (التذاكر) shows the conversation's tickets. Each ticket is a card with a status badge (such as In progress (قيد المعالجة)), the creation date, and a summary that starts with Problem: (المشكلة:). For more, see Tickets.
Customer card
Click the customer name in the conversation header to show the Customer card (بطاقة العميل): a quick view of the customer's data without leaving the conversation.
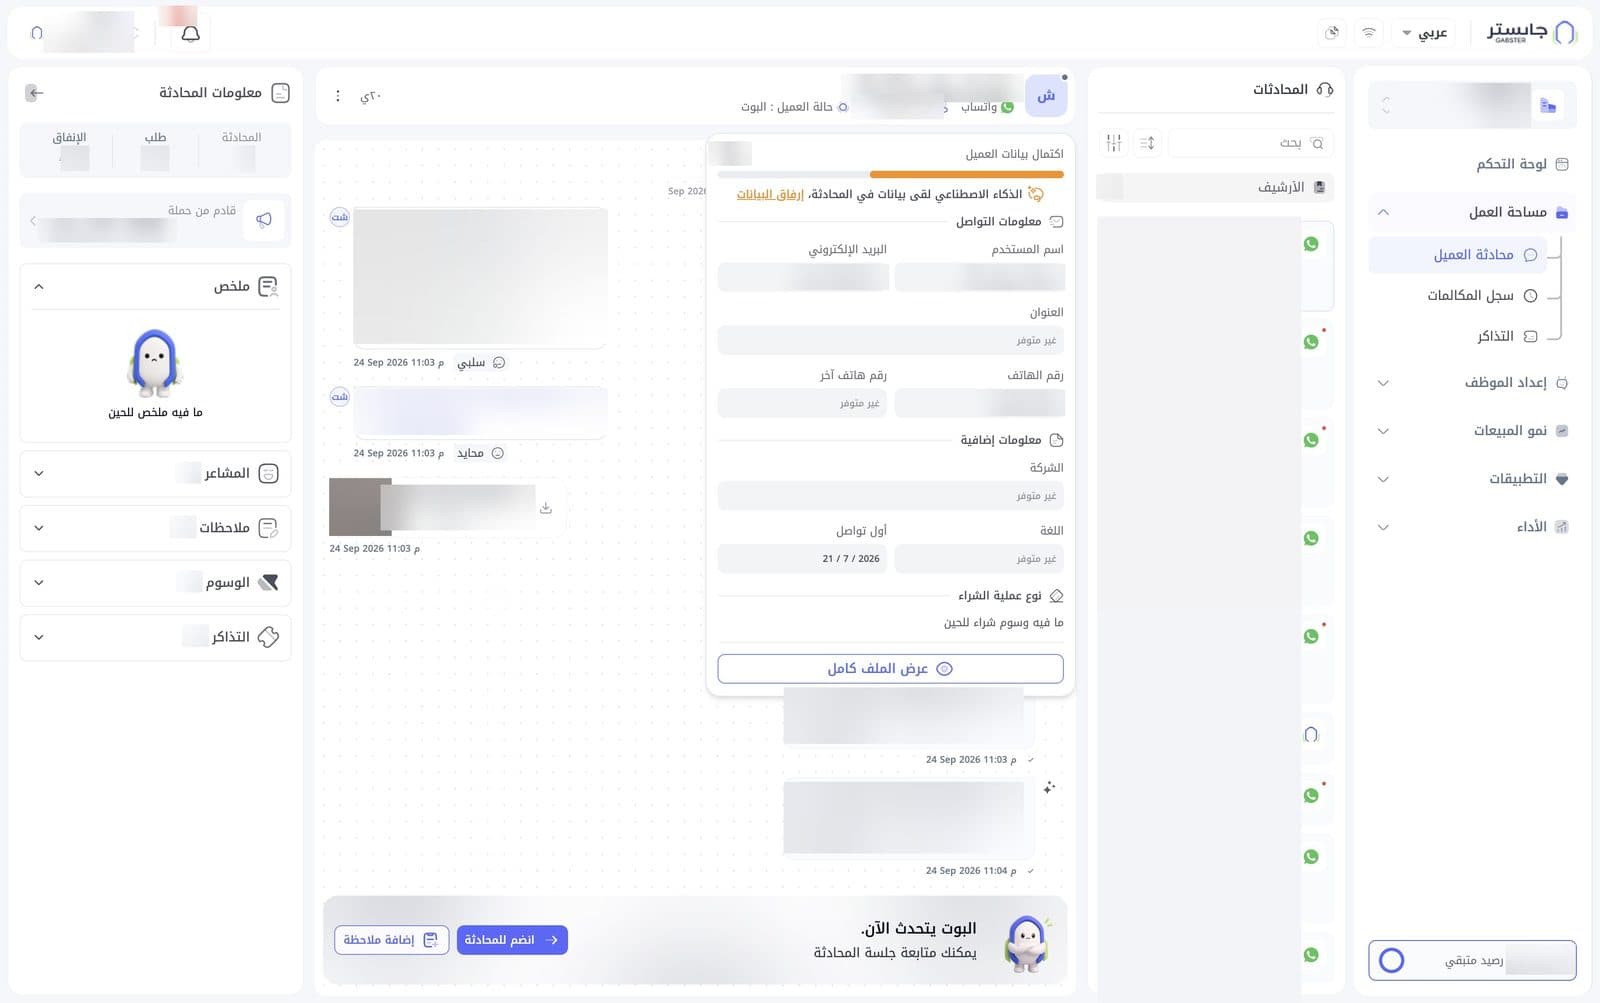
- Profile completeness (اكتمال بيانات العميل): a percentage and bar showing how complete the customer's data is.
- The notice AI found data in the conversation, (الذكاء الاصطناعي لقى بيانات في المحادثة،) with the Attach data (إرفاق البيانات) link: appears when AI finds customer data inside the conversation.
- Contact info (معلومات التواصل): Username (اسم المستخدم), Email (البريد الإلكتروني), Address (العنوان), Phone number (رقم الهاتف), Other phone number (رقم هاتف آخر).
- Extra info (معلومات إضافية): Company (الشركة), Language (اللغة), First contact (أول تواصل).
- Purchase type (نوع عملية الشراء): the customer's purchase tags, or a note that there are none yet.
- View full profile (عرض الملف كامل): opens the customer's full profile.
Any field without data shows Not available (غير متوفر).
Full customer profile
View full profile opens the Customer profile (بيانات العميل) window over the page.
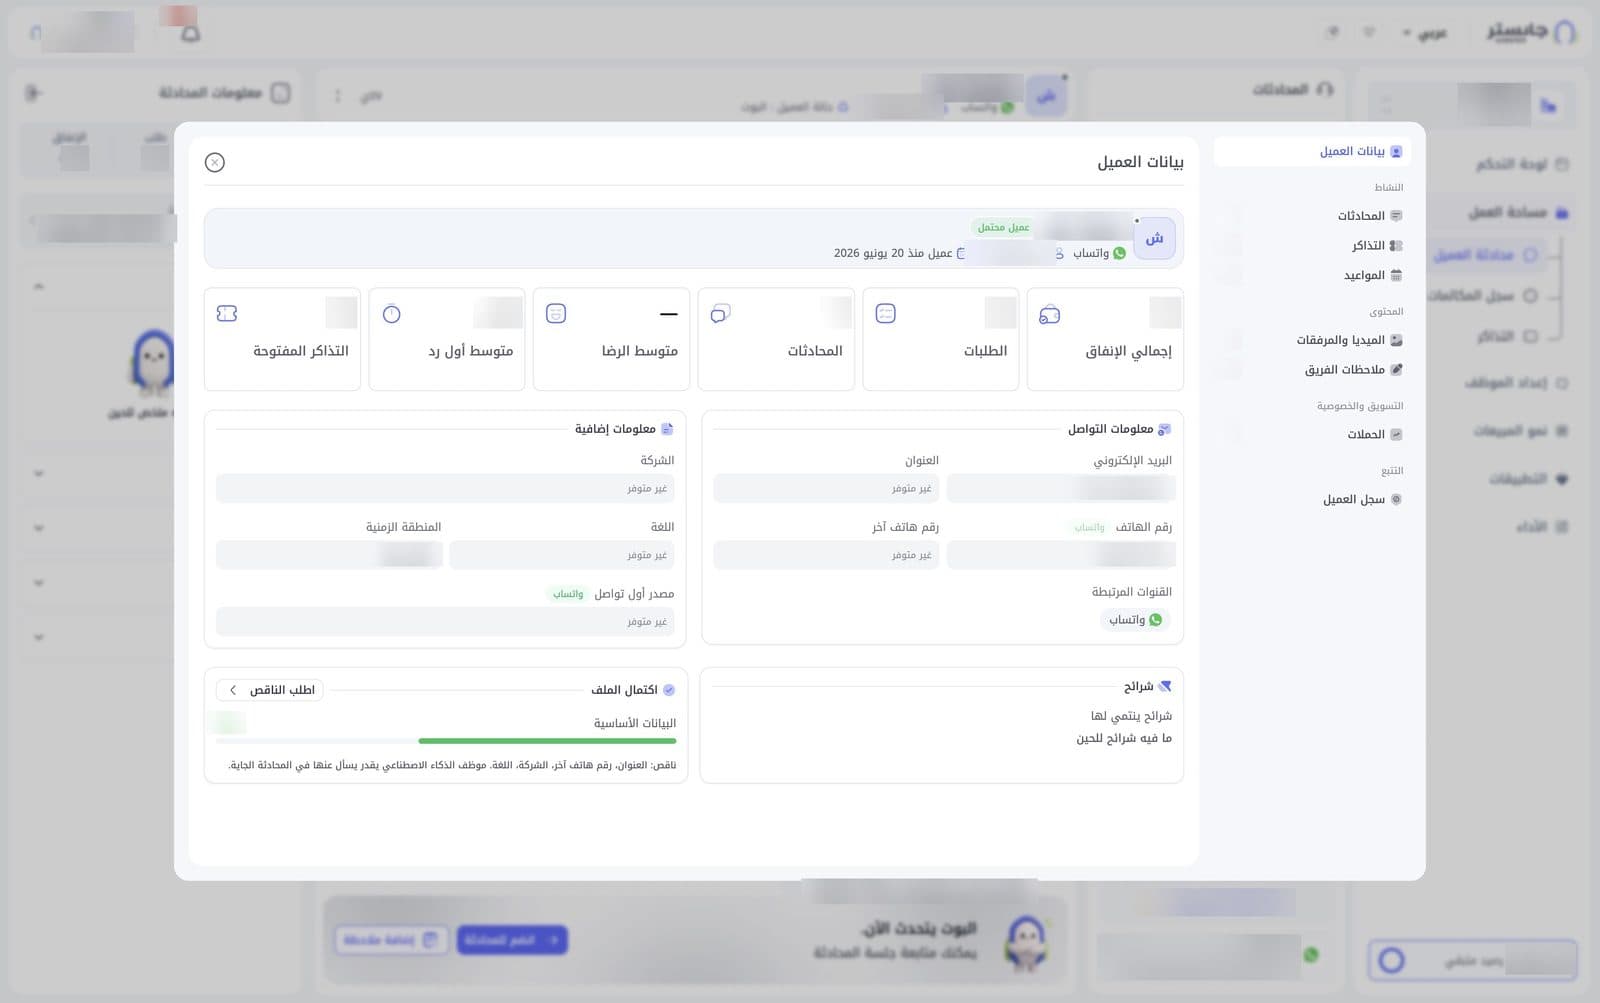
Side navigation
On the right of the window, Customer profile (بيانات العميل) is selected by default, followed by groups whose items each show a count:
| Group | Items |
|---|---|
| Activity (النشاط) | Conversations (المحادثات), Tickets (التذاكر), Appointments (المواعيد) |
| Content (المحتوى) | Media & attachments (الميديا والمرفقات), Team notes (ملاحظات الفريق) |
| Marketing & privacy (التسويق والخصوصية) | Campaigns (الحملات) |
| Tracking (التتبع) | Customer log (سجل العميل) |
Customer profile view
- Identity card: the name, a customer status chip (such as Lead (عميل محتمل)), the channel, the assigned staff member and the Customer since (عميل منذ) date.
- Figures: Total spend (إجمالي الإنفاق), Orders (الطلبات), Conversations (المحادثات), Average satisfaction (متوسط الرضا), Average first reply (متوسط أول رد), Open tickets (التذاكر المفتوحة).
- Contact info (معلومات التواصل): Email, Address, Phone number, Other phone number, and Linked channels (القنوات المرتبطة).
- Extra info (معلومات إضافية): Company, Language, Time zone (المنطقة الزمنية), First contact source (مصدر أول تواصل).
- Segments (شرائح): the segments the customer belongs to, or a note that there are none yet.
- Profile completeness (اكتمال الملف): the Basic data (البيانات الأساسية) percentage and a list of missing fields. The window notes that your AI Agent can ask the customer for them in the next conversation. Next to it is the Request missing (اطلب الناقص) button.
To close the window, use the × button at its top.