
Apps
Calendars
Create bookable calendars, set when your staff are available and review confirmed bookings.
Calendars (التقويمات) organise the appointments your customers book. Each calendar is a bookable meeting type with a name and a length, assigned to one or more staff members. Here you create calendars, set when each staff member is available, design the booking form and review bookings.
How to open it
In the sidebar, open Apps (التطبيقات) and choose Calendars (التقويمات). Three tabs run across the top:
| Tab | What it shows |
|---|---|
| Calendar (التقويم) | One calendar and every staff member assigned to it |
| Member (العضو) | One staff member's slots on one calendar, day by day |
| Members (الأعضاء) | The list of staff members and the calendars each one is on |
Calendar tab
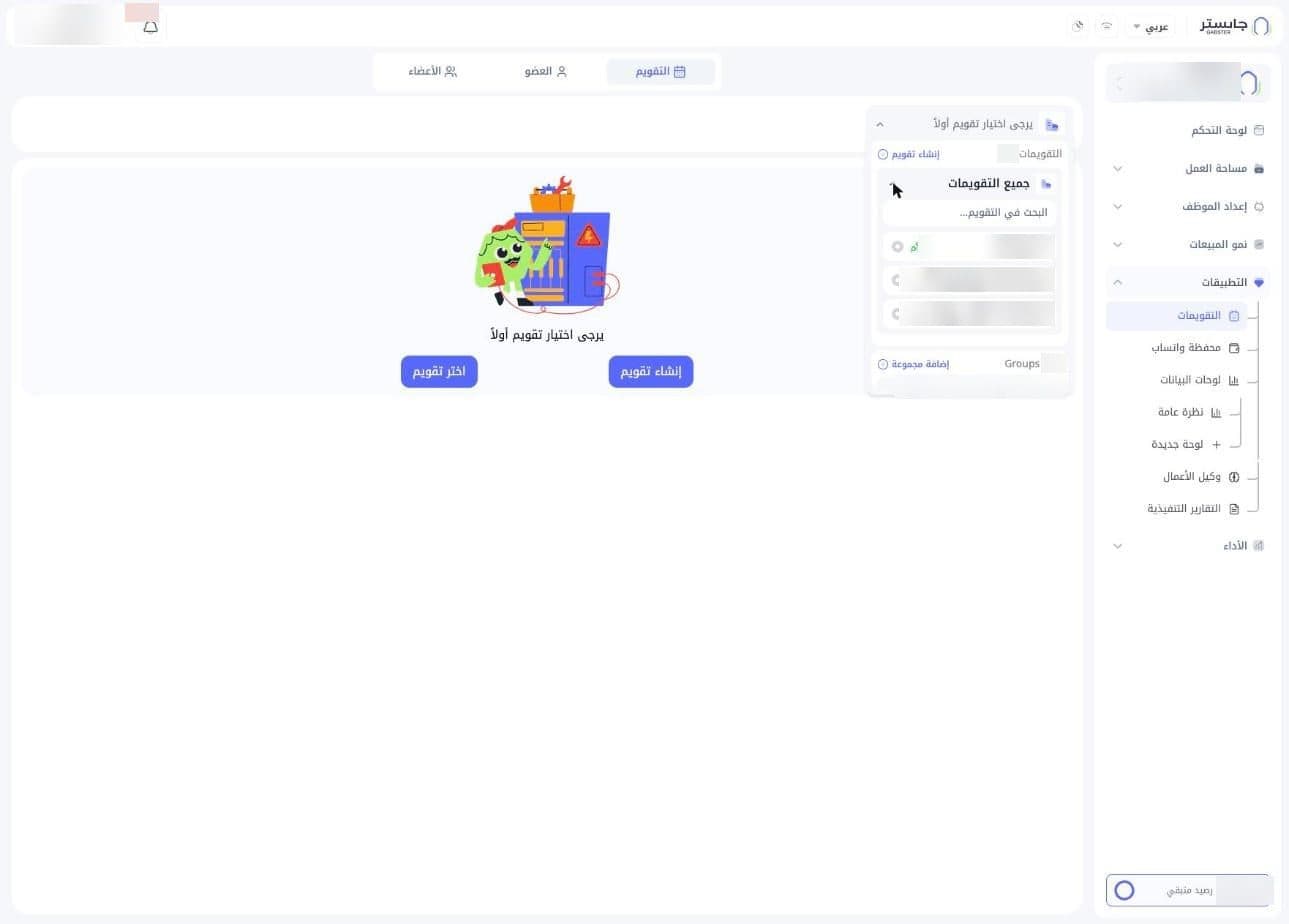
Start by picking a calendar. Until you do, the tab shows Please select a calendar first (يرجى اختيار تقويم أولاً) with two buttons: Create calendar (إنشاء تقويم) and Choose calendar (اختر تقويم).
Choose a calendar
Click the calendar selector at the top to open the selector panel:
- Calendars (التقويمات) with their count, and a Create calendar (إنشاء تقويم) link to add a new one.
- All calendars (جميع التقويمات): expand this group to see a numbered list of all your calendars, with a Search calendars (البحث في التقويم...) box to find one by name. Select a calendar to open it.
- Groups: the groups you collect calendars into, with an Add group (إضافة مجموعة) link. Each group has an options button (⋮) and an arrow to expand it.
The selected calendar
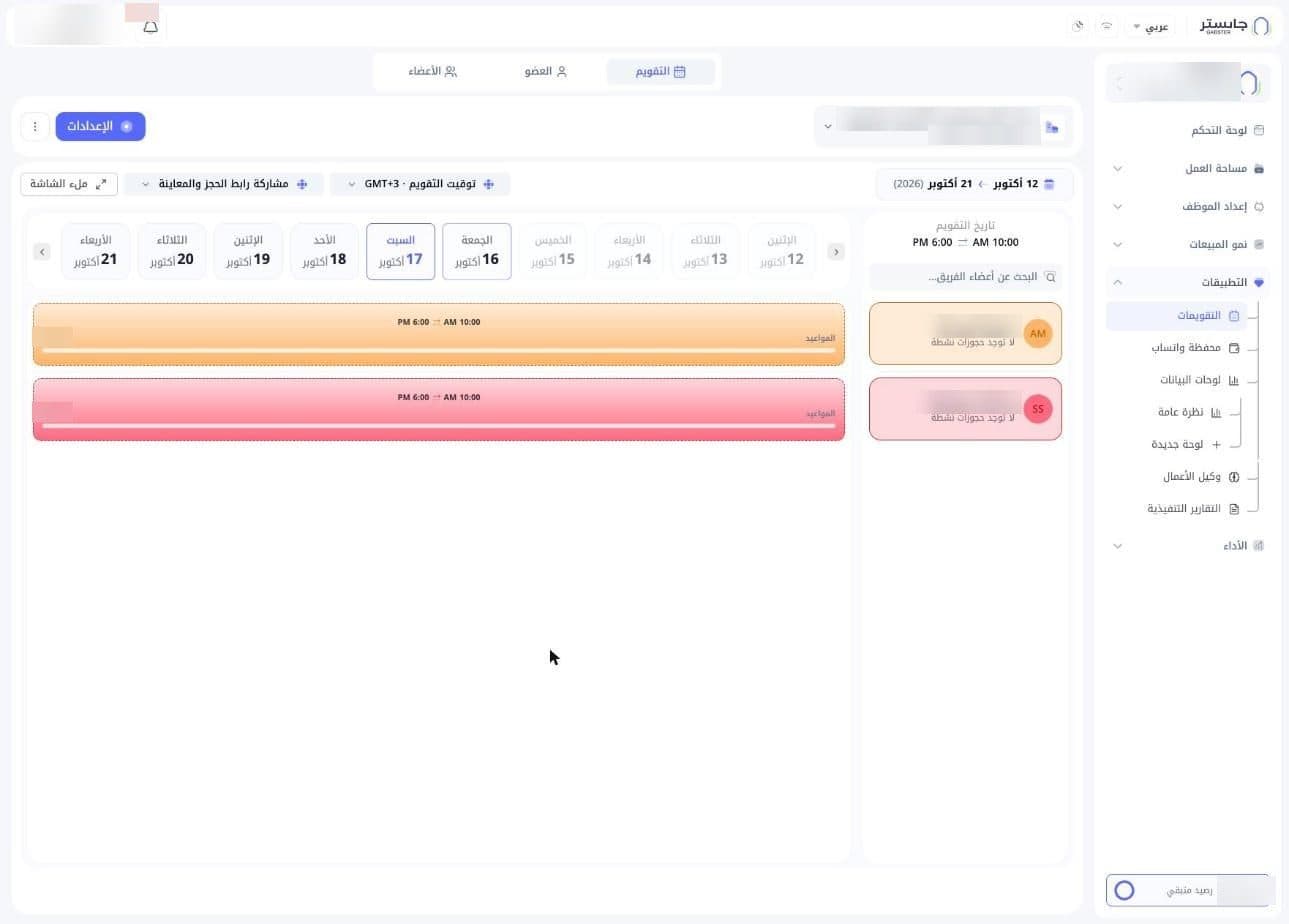
Once a calendar is selected, the header shows its name with today's booking count and the number of members below it. These tools appear:
- Date range: the period the day strip covers.
- Calendar timezone (توقيت التقويم): the timezone the times are shown in.
- Share booking link & preview (مشاركة رابط الحجز والمعاينة): a menu for the booking page link.
- Full screen (ملء الشاشة): shows the calendar across the whole screen.
- The day strip: one card per day, with an arrow at each end. Past days are greyed out and the selected day has a blue border.
The side column shows Calendar hours (تاريخ التقويم, the calendar's daily working hours), a Search team members (البحث عن أعضاء الفريق...) box and a coloured card for each staff member on the calendar. The card shows the member's name and status, such as No active bookings (لا توجد حجوزات نشطة). Next to each card, a bar in the same colour shows that member's working hours on the selected day and their Appointments (المواعيد) count.
Settings and the options menu
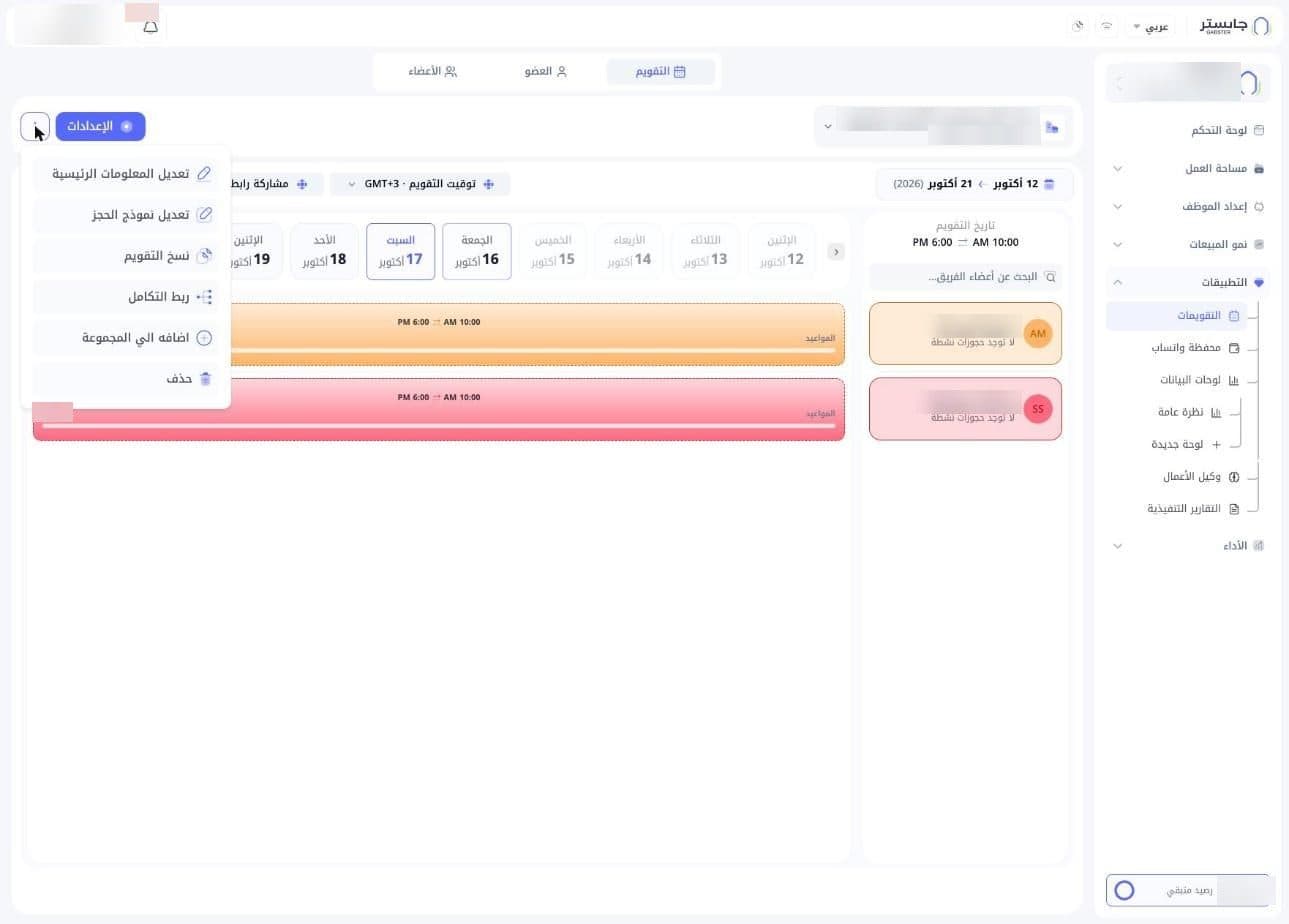
With a calendar selected, a Settings (الإعدادات) button and an options button (⋮) appear.
The options menu (⋮) holds:
| Option | Use it to |
|---|---|
| Edit main info (تعديل المعلومات الرئيسية) | Change the calendar's basic details |
| Edit booking form (تعديل نموذج الحجز) | Open the booking form builder (see below) |
| Duplicate calendar (نسخ التقويم) | Make a copy of the calendar |
| Connect integration (ربط التكامل) | Connect the calendar to an integration |
| Add to group (اضافه الي المجموعة) | Put the calendar in one of your groups |
| Delete (حذف) | Delete the calendar |
Create a calendar
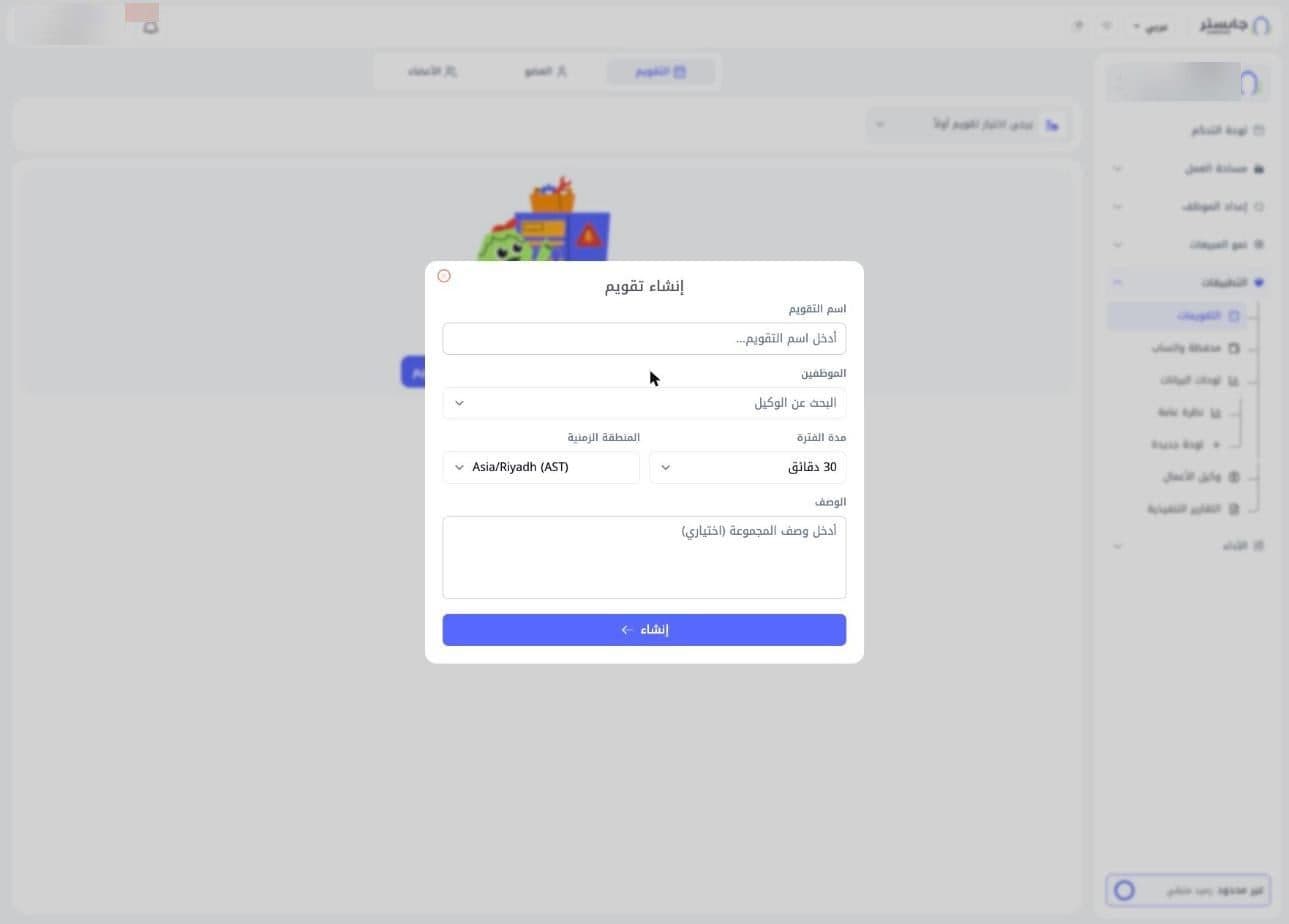
Click Create calendar (إنشاء تقويم), from the empty state or the selector panel, to open the dialog, then fill in:
| Field | What to enter |
|---|---|
| Calendar name (اسم التقويم) | The meeting type's name |
| Staff (الموظفين) | The staff members who take bookings on this calendar; search for them by name |
| Slot length (مدة الفترة) | How long each appointment lasts; 30 minutes by default |
| Timezone (المنطقة الزمنية) | The calendar's timezone; Asia/Riyadh (AST) by default |
| Description (الوصف) | An optional description |
Then click Create (إنشاء). The dialog has a red close button at its top.
Booking form
From the options menu (⋮), choose Edit booking form (تعديل نموذج الحجز) to design the form customers fill in when they book.
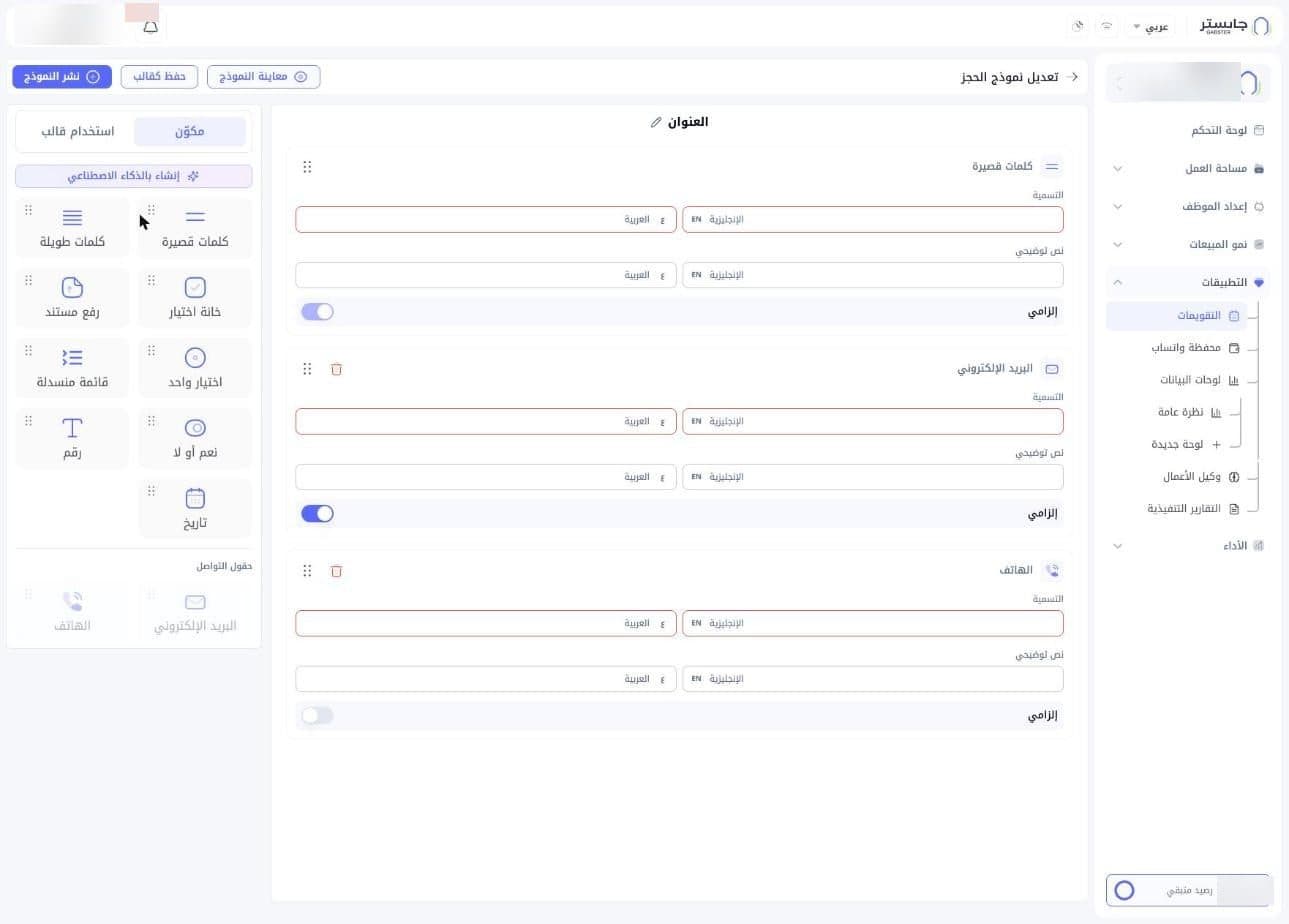
Form fields
The middle of the page shows the form title (العنوان) with a pencil icon next to it. Below it is one card per field, with:
- Label (التسمية): the field name in English and Arabic.
- Helper text (نص توضيحي): an optional hint for the customer, in English and Arabic.
- Required (إلزامي): a switch that decides whether the customer must fill in the field.
- A drag handle (six dots) and a red delete icon. The first field (Short text (كلمات قصيرة)) has no delete icon, and its Required switch is on and greyed out.
Add fields
In the Components (مكوّن) panel, drag a field type onto the form:
Short text (كلمات قصيرة), Long text (كلمات طويلة), Checkbox (خانة اختيار), Upload document (رفع مستند), Single choice (اختيار واحد), Dropdown (قائمة منسدلة), Yes or no (نعم أو لا), Number (رقم), Date (تاريخ).
Under Contact fields (حقول التواصل) you'll find Email (البريد الإلكتروني) and Phone (الهاتف); both appear greyed out.
You can also use Generate with AI (إنشاء بالذكاء الاصطناعي) to create fields.
Templates and publishing
- Save as booking form template (حفظ كقالب): save the form as a booking form template.
- Use booking form template (استخدام قالب): a tab next to Components for booking form templates. When there are none, it shows No templates yet (لا توجد قوالب بعد).
- Preview form (معاينة النموذج): a button with an eye icon.
- Publish form (نشر النموذج): the blue button at the top of the page.
Next to the Edit booking form (تعديل نموذج الحجز) page title is a back arrow.
Members tab
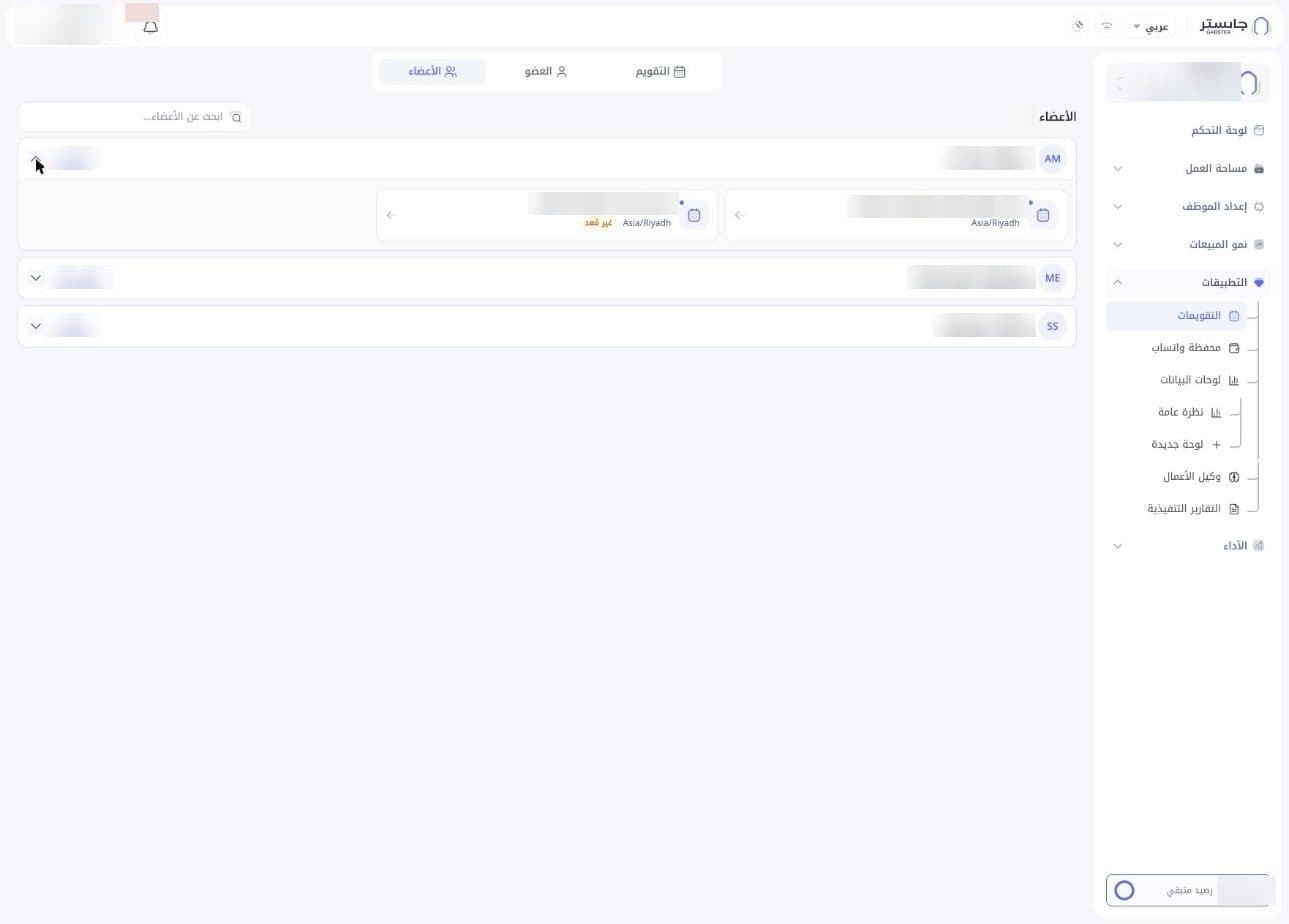
The Members (الأعضاء) tab lists every staff member assigned to calendars, with a count. Use Search members (ابحث عن الأعضاء...) to find one by name.
Each member has a row with their name and a badge showing how many calendars they're on (for example 1 calendar (تقويم واحد) or 2 calendars (تقويمان)). Expand the row with the arrow to see a card for each calendar: its name, length and timezone. A card can carry an orange Not set up (غير مُعد) badge.
Member tab
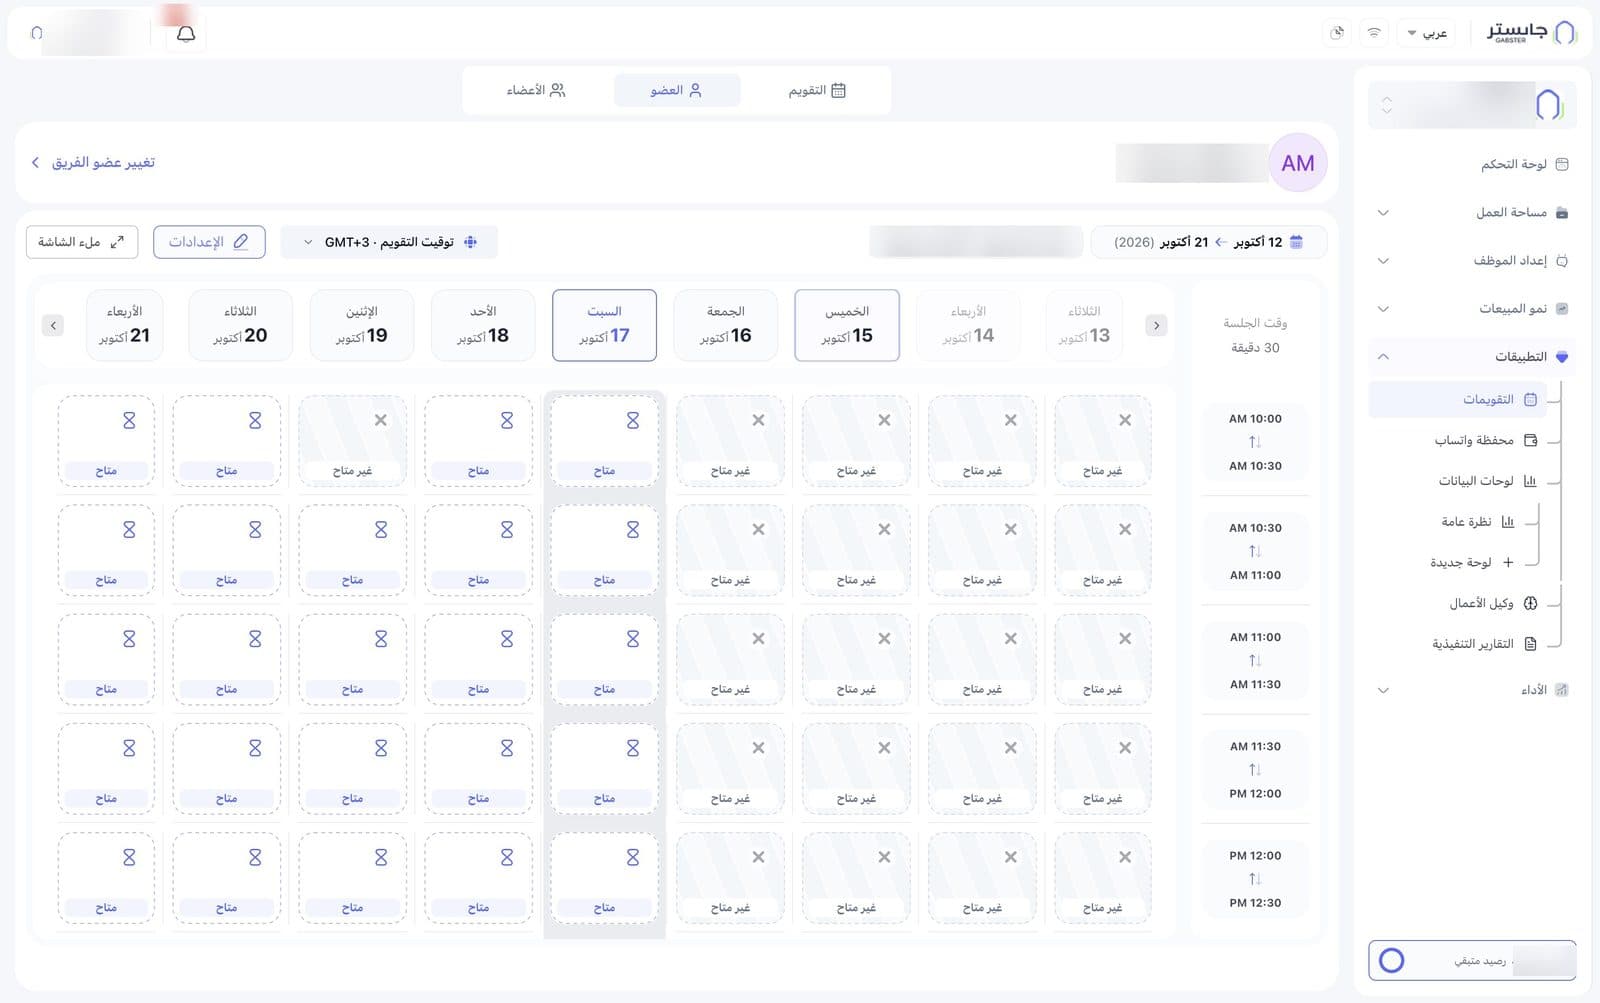
The Member (العضو) tab shows one staff member's calendar for one meeting type. At the top are the member's name and a Change team member (تغيير عضو الفريق) link to pick someone else.
Below that, a toolbar holds the date range, the meeting type and its length, Calendar timezone (توقيت التقويم), a Settings (الإعدادات) button that opens the schedule settings, and Full screen (ملء الشاشة).
Slot grid
The Session time (وقت الجلسة) column shows the length of each slot (for example 30 minutes) and its time range, and each day in the day strip has its own column. Every cell is one slot in one of these states:
| State | Looks like | Meaning |
|---|---|---|
| Available (متاح) | Dashed border and an hourglass icon | The slot can be booked |
| Unavailable (غير متاح) | Grey striped background | The slot can't be booked, e.g. a past day or a day switched off in settings |
| Confirmed (مؤكد) | Solid blue card with a check mark | A booked slot, showing the booking title |
Booking details
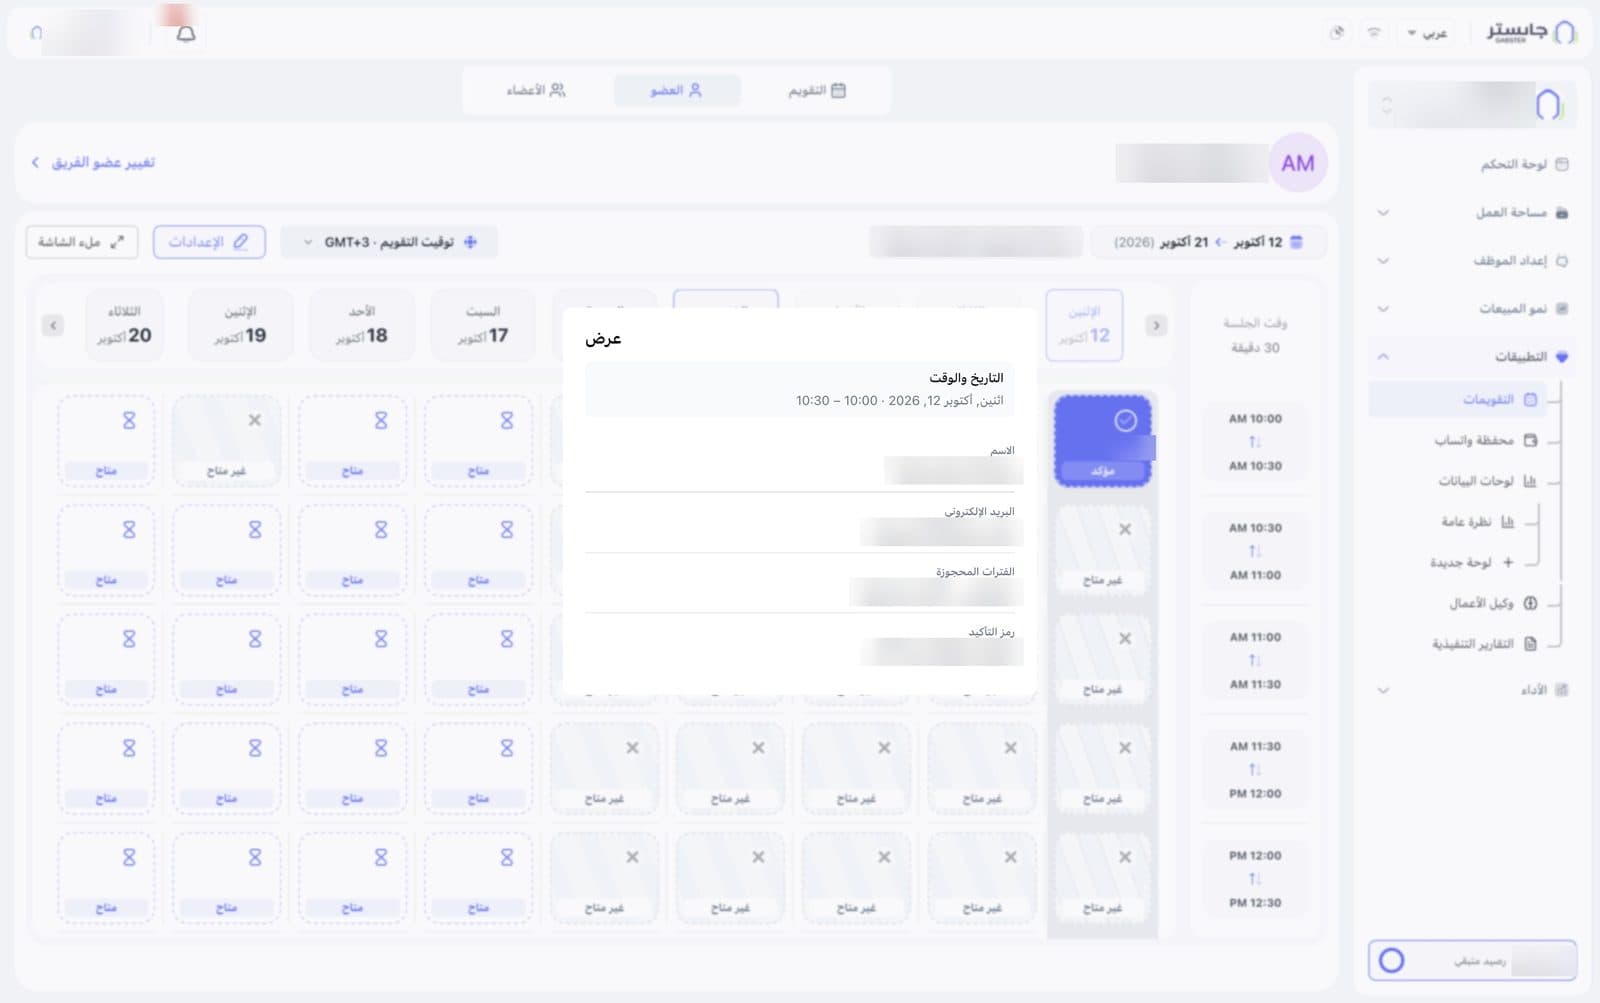
Click a Confirmed (مؤكد) slot to see the booking details card. The card is read-only and shows:
- Date & time (التاريخ والوقت)
- Name (الاسم): the customer who booked
- Email (البريد الإلكتروني): the customer's email
- Booked slots (الفترات المحجوزة): the meeting that was booked
- Confirmation code (رمز التأكيد): the booking reference
The card has no button to cancel or move the booking. Customers can cancel from the link in their booking confirmation and reminder emails.
Schedule settings
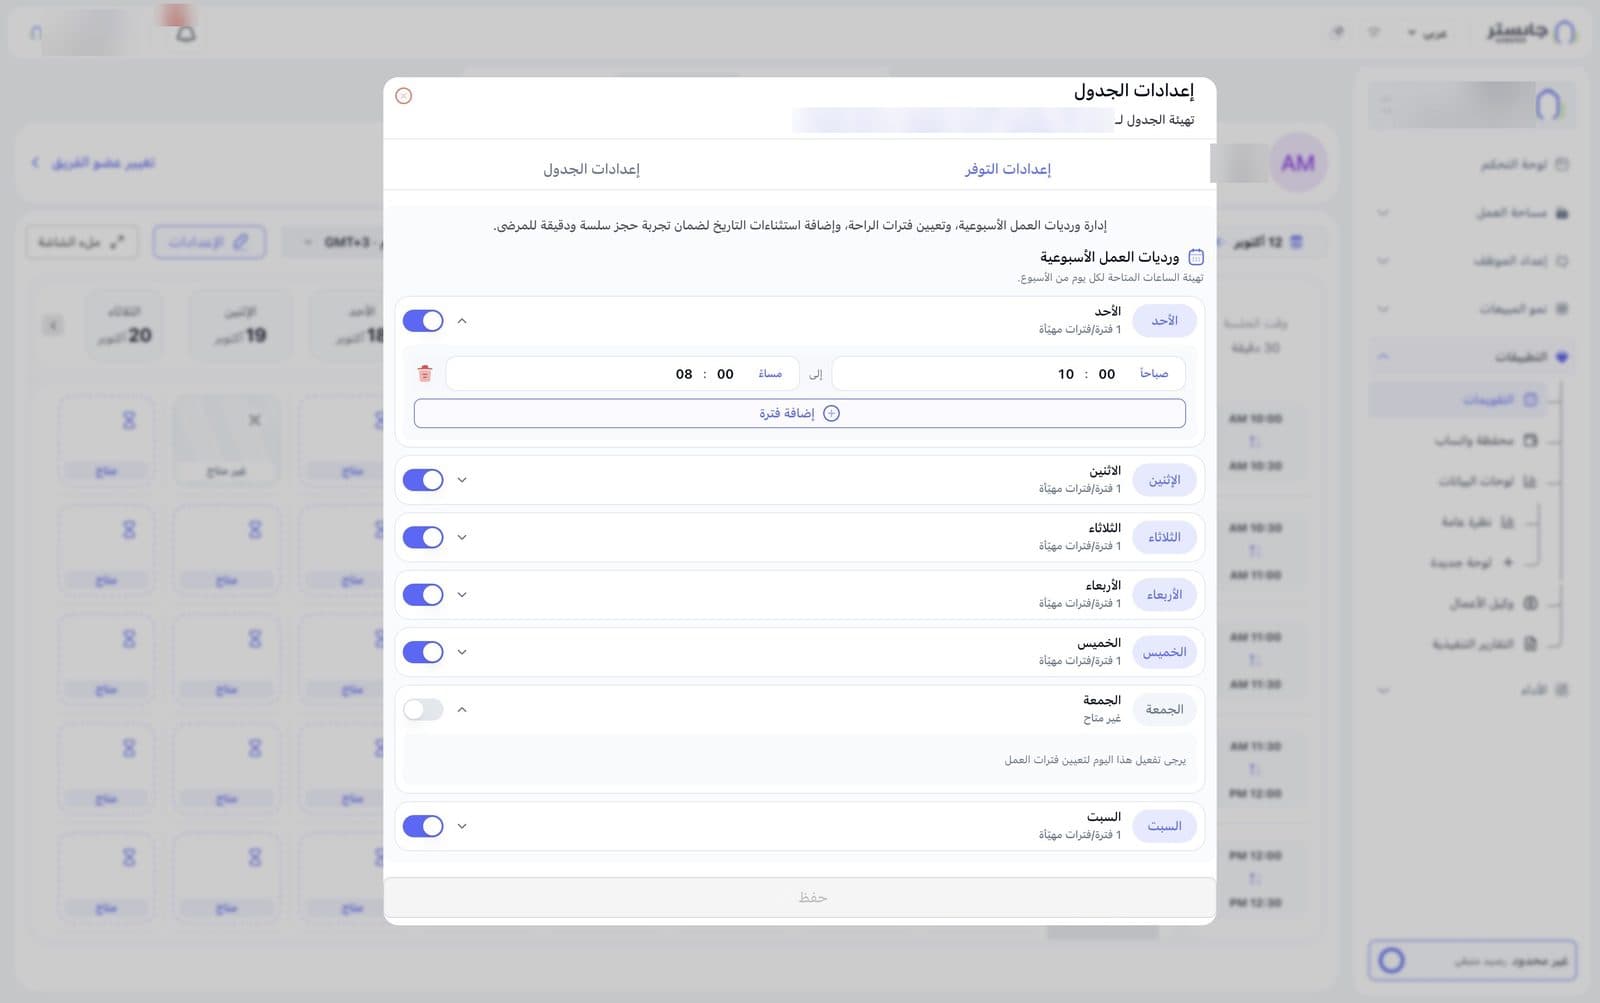
On the Member (العضو) tab, click Settings (الإعدادات) to open Schedule settings (إعدادات الجدول). Under the title you'll see which staff member and meeting type you're configuring: settings apply to each member on each calendar separately.
Availability settings
The Weekly work shifts (ورديات العمل الأسبوعية) section has one row per weekday:
- Use the switch to turn a day on or off. A day that's off shows Unavailable (غير متاح); expanding it shows Please enable this day to set work periods (يرجى تفعيل هذا اليوم لتعيين فترات العمل).
- Expand a day with the arrow to set its periods: a start time, to (إلى), and an end time, in 12-hour format (AM / PM).
- Add period (إضافة فترة): add another period on the same day, for example to leave a break between two shifts. The red delete icon removes a period.
Schedule settings tab
The second tab has three panels:
- Schedule setup (إعداد الجدول): date exceptions. Click Add exception (إضافة استثناء) to add a date that differs from the usual schedule. With no exceptions, it shows No date exceptions configured yet. (لم يتم تهيئة استثناءات التاريخ بعد.)
- Pattern settings (إعدادات النمط): Pattern start (بداية النمط) and Pattern end (نهاية النمط) dates, and Repeat (weeks) (التكرار (أسابيع)) for the weekly pattern.
- Availability manager (مدير التوفر): the appointment Duration (minutes) (المدة (دقيقة)), 30 by default, plus Buffer before (فاصل قبل (دقيقة)) and Buffer after (فاصل بعد (دقيقة)) to keep free time before and after each appointment (0 by default).
Repeat (weeks) is 1 by default, and the pattern dates start empty.
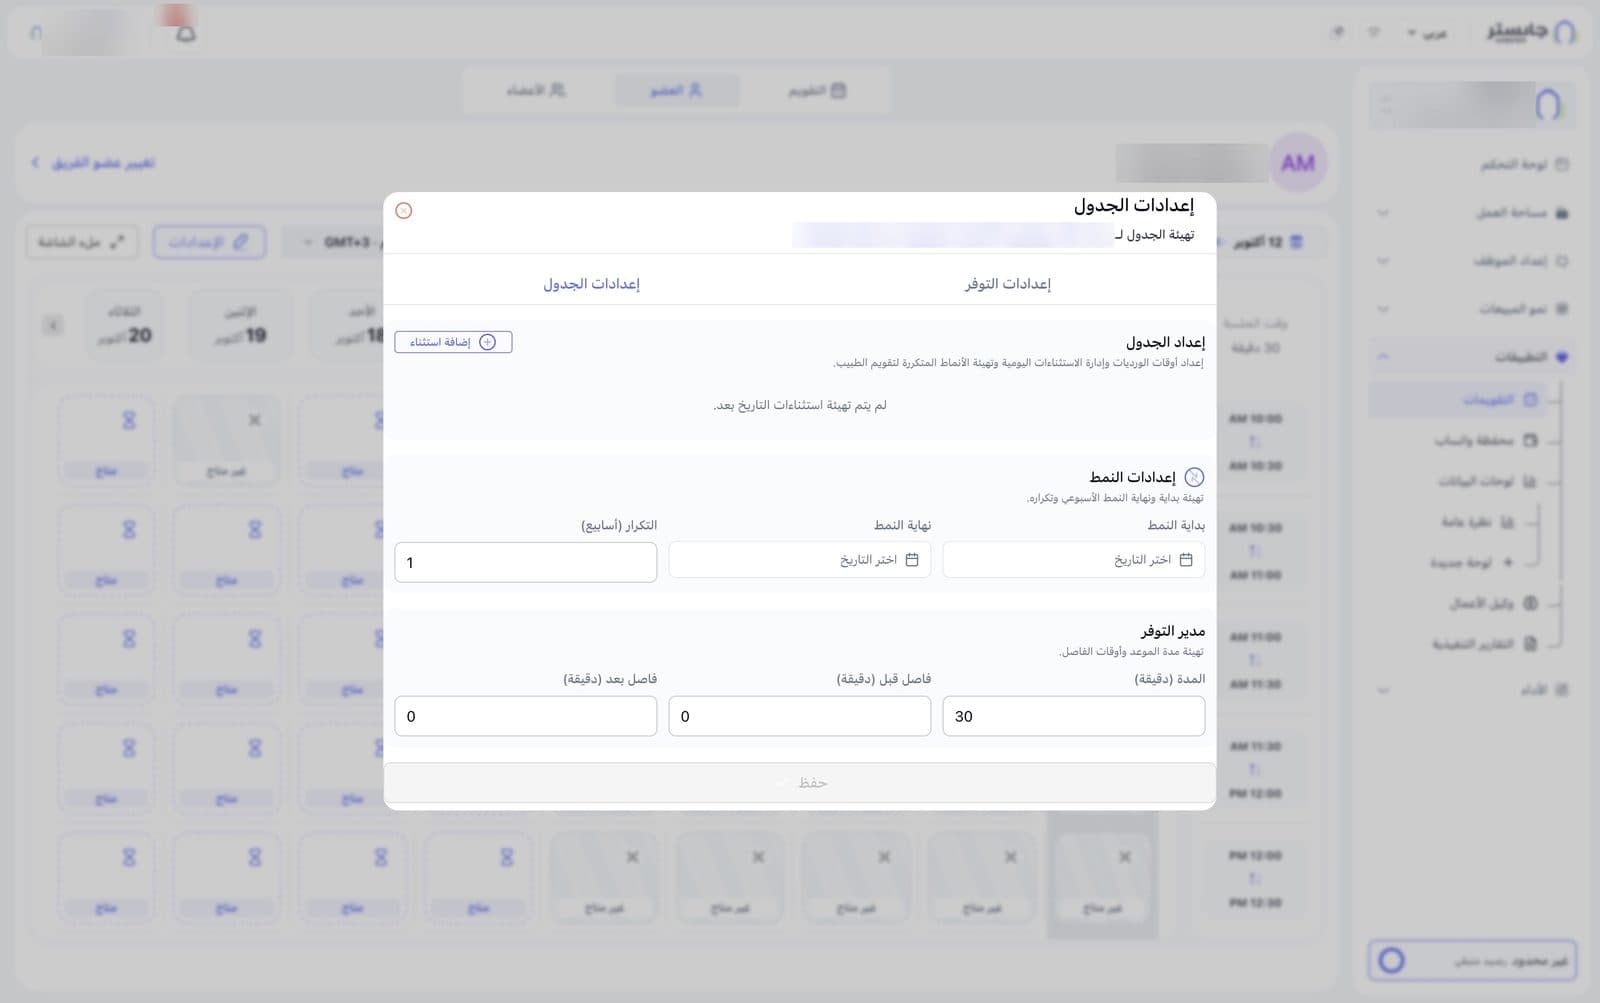
When you're done, click Save (حفظ) at the bottom of the window. Before you make any change, the button is greyed out and disabled.