
Sales growth
Campaigns
Create WhatsApp templates, send them to your customers as campaigns, and track results, cost and the status of every recipient.
Campaigns (الحملات) is where you run WhatsApp marketing and utility messages for your project: create WhatsApp templates, pick recipients and send the campaign, then follow how many messages were sent, delivered and read, and what they cost. It is built for sales and marketing teams and account managers.
How to open it
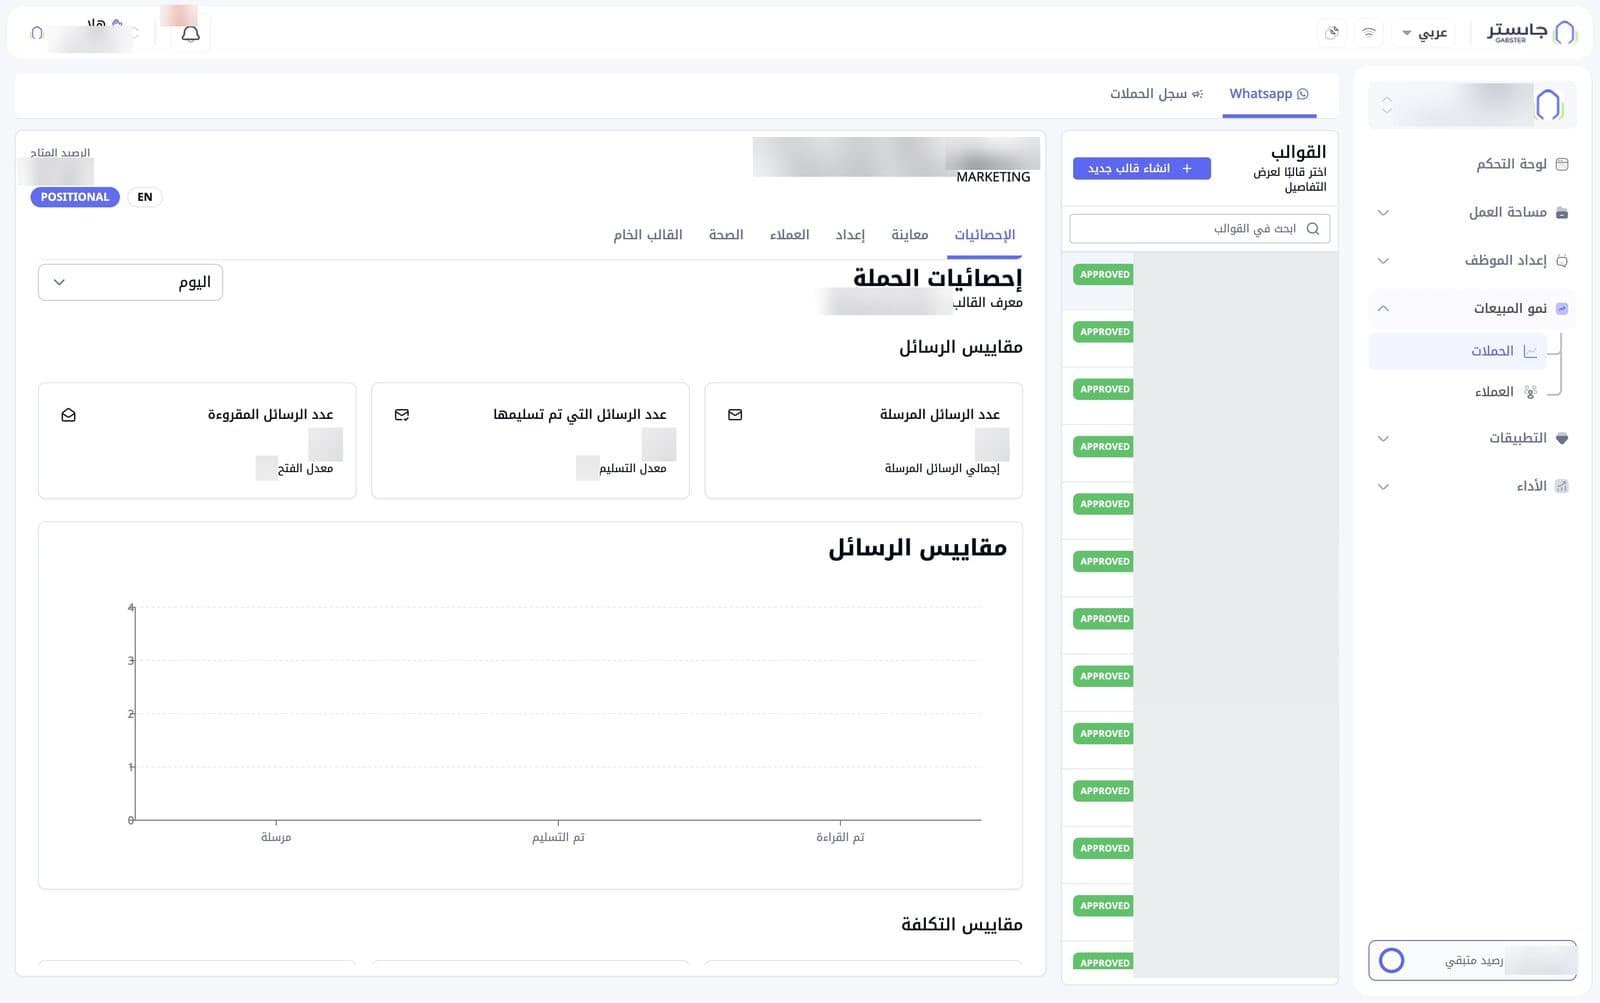
In the sidebar, open Sales Growth (نمو المبيعات) and choose Campaigns (الحملات). The page opens on the WhatsApp (Whatsapp) tab; next to it is the Campaign Log (سجل الحملات) tab.
WhatsApp template list
On the right of the WhatsApp tab, the WhatsApp templates (القوالب) panel lists your project's WhatsApp templates.
- Create new WhatsApp template (انشاء قالب جديد): opens the template wizard (see the next section).
- Search WhatsApp templates (ابحث في القوالب): type to find a template.
- Each row shows the template name, its ID (المعرف) and a status badge such as APPROVED. The badge shows Meta's review status: APPROVED in green, PENDING in yellow, REJECTED in red, and grey for others such as PAUSED or DISABLED.
Choose a template in the list to see its details on the left.
Several templates can share the same name. Use the ID to make sure you picked the right one.
Selected template header
The top of the details shows the template name and its category (e.g. MARKETING), plus:
- Available balance (الرصيد المتاح), in SAR.
- A POSITIONAL badge.
- The template language badge, e.g. EN.
Below the header are six sub-tabs: Statistics (الإحصائيات), Preview (معاينة), Setup (إعداد), Customers (العملاء), Health (الصحة) and Raw template (القالب الخام).
Create a WhatsApp template
Click Create new WhatsApp template to open the Create WhatsApp template (إنشاء قالب واتساب) window. The wizard has three steps, shown as tabs: Basics (الأساسيات), Content (المحتوى) and Buttons (الأزرار). The footer shows where you are (e.g. Step 1 of 3). On the left, a live WhatsApp-style preview shows the message as you build it.
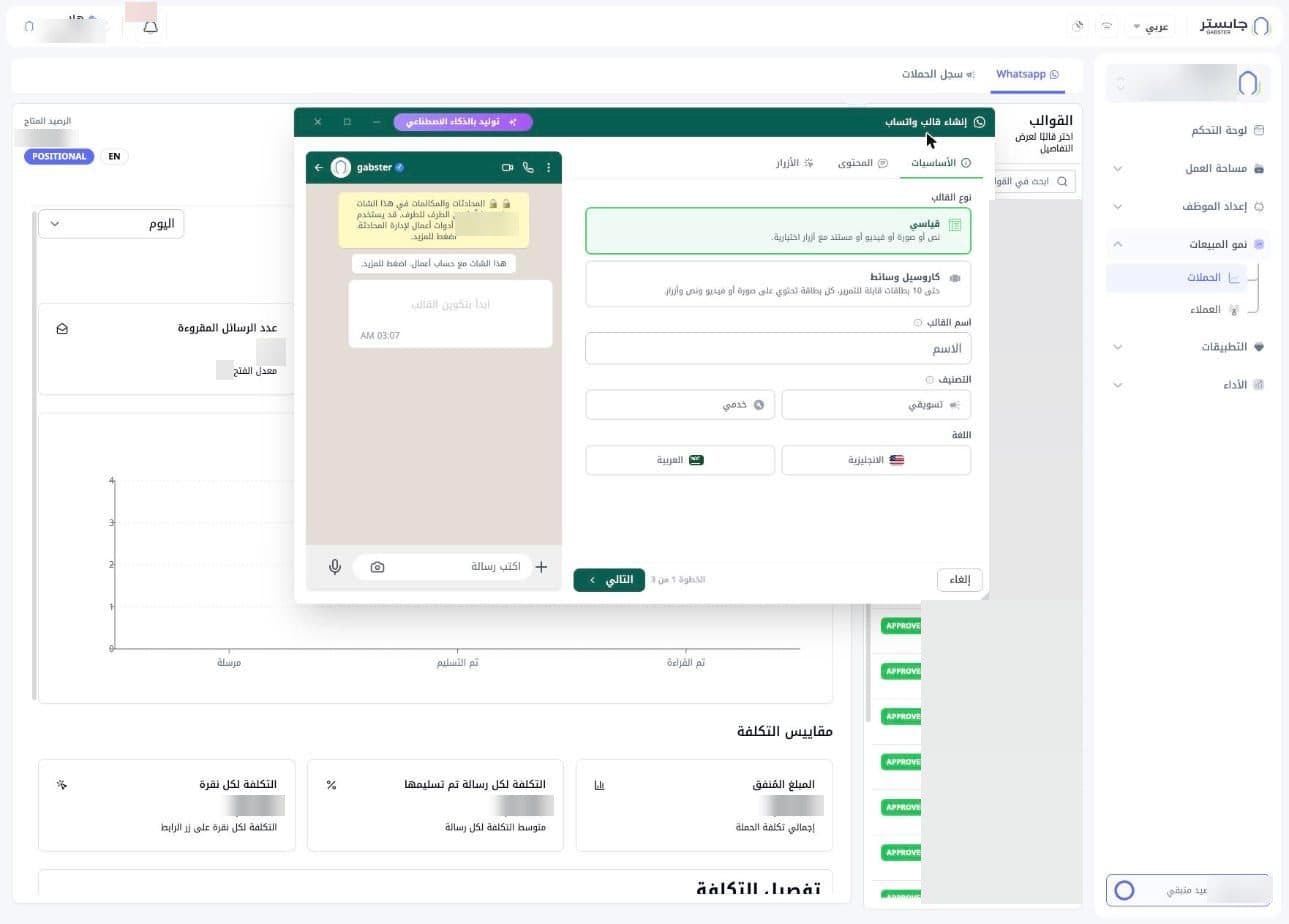
The window's title bar holds a Generate with AI (توليد بالذكاء الاصطناعي) button and minimise, maximise and close icons.
Step 1: Basics
| Field | What you choose |
|---|---|
| Template type (نوع القالب) | Standard (قياسي): text, image, video or document with optional buttons (selected by default). Media carousel (كاروسيل وسائط): up to 10 scrollable cards, each with an image or video, text and buttons |
| Template name (اسم القالب) | The template's name. Required |
| Category (التصنيف) | Marketing (تسويقي) or Utility (خدمي). Required |
| Language (اللغة) | English (الانجليزية) or Arabic (العربية). Required |
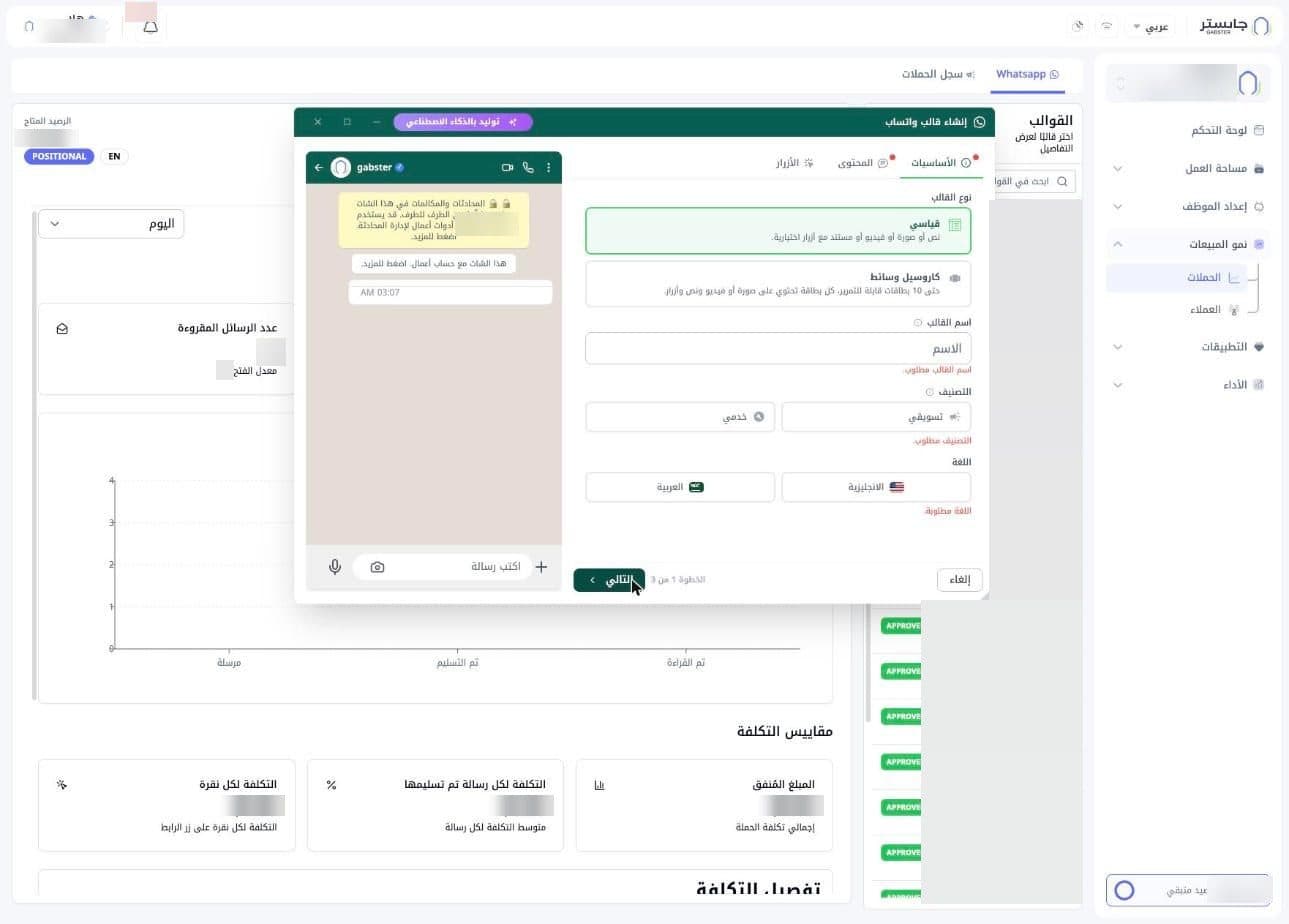
If you click Next (التالي) with required fields empty, you stay on the step and see messages such as Template name is required. (اسم القالب مطلوب.), Category is required. (التصنيف مطلوب.) and Language is required. (اللغة مطلوبة.). A red dot marks each step tab with missing input.
Step 2: Content
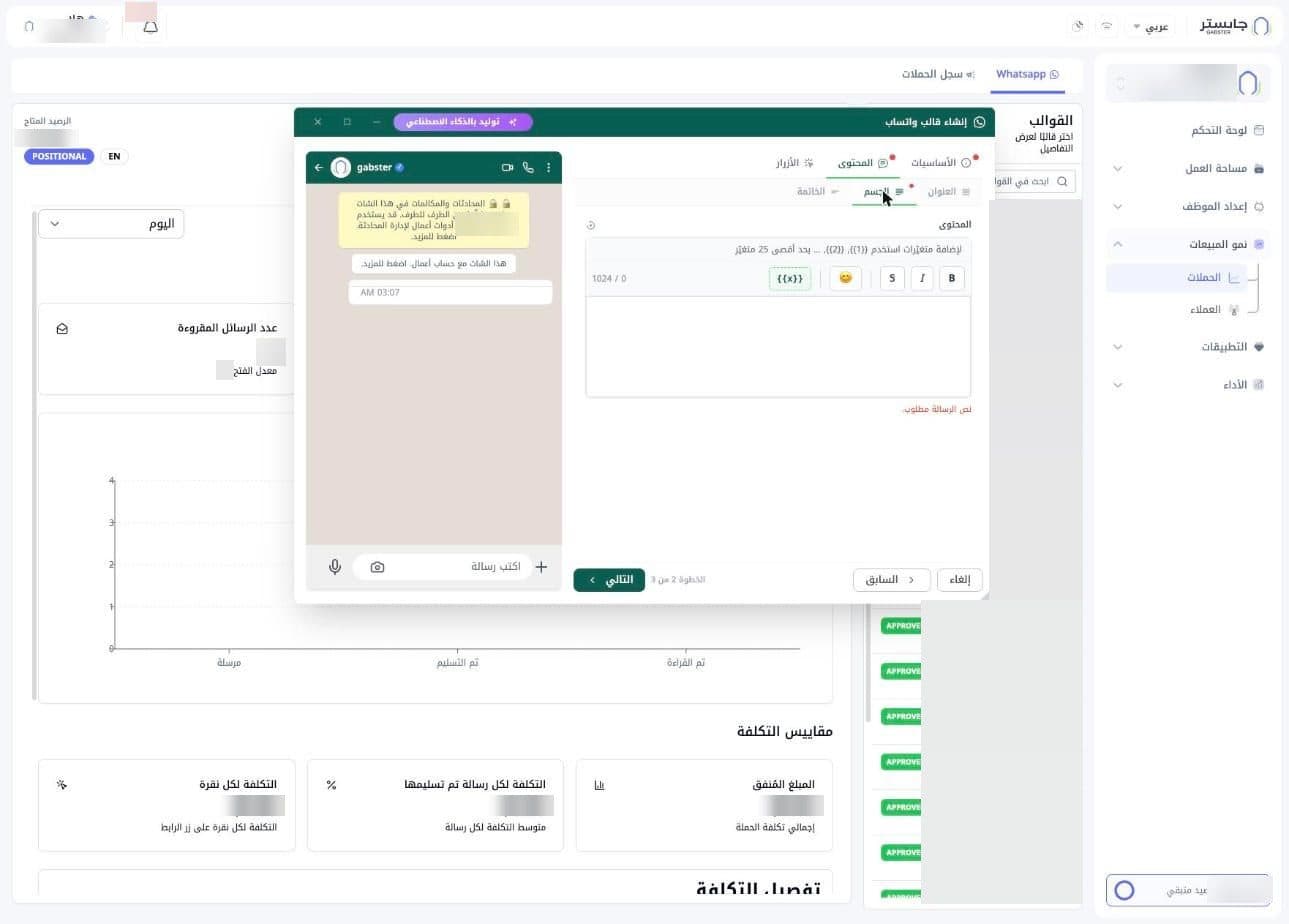
This step has three sub-tabs: Header (العنوان), Body (الجسم) and Footer (الخاتمة).
- Header: choose the header format: None (بدون, default), Text (نص), Image (صورة), Video (فيديو) or Document (مستند).
- Body: write the message text. It is required, limited to 1024 characters, with a character counter. To add variables, use
{{1}},{{2}}and so on, up to 25 variables. The toolbar has B, I and S buttons, an emoji button and a{{x}}button. - Footer: the third sub-tab of this step.
If the body is empty you see Message text is required. (نص الرسالة مطلوب.).
Step 3: Buttons
Choose the button type: No buttons (لا يوجد ازرار, default), Quick reply (رد سريع) or CTA button (زر CTA).
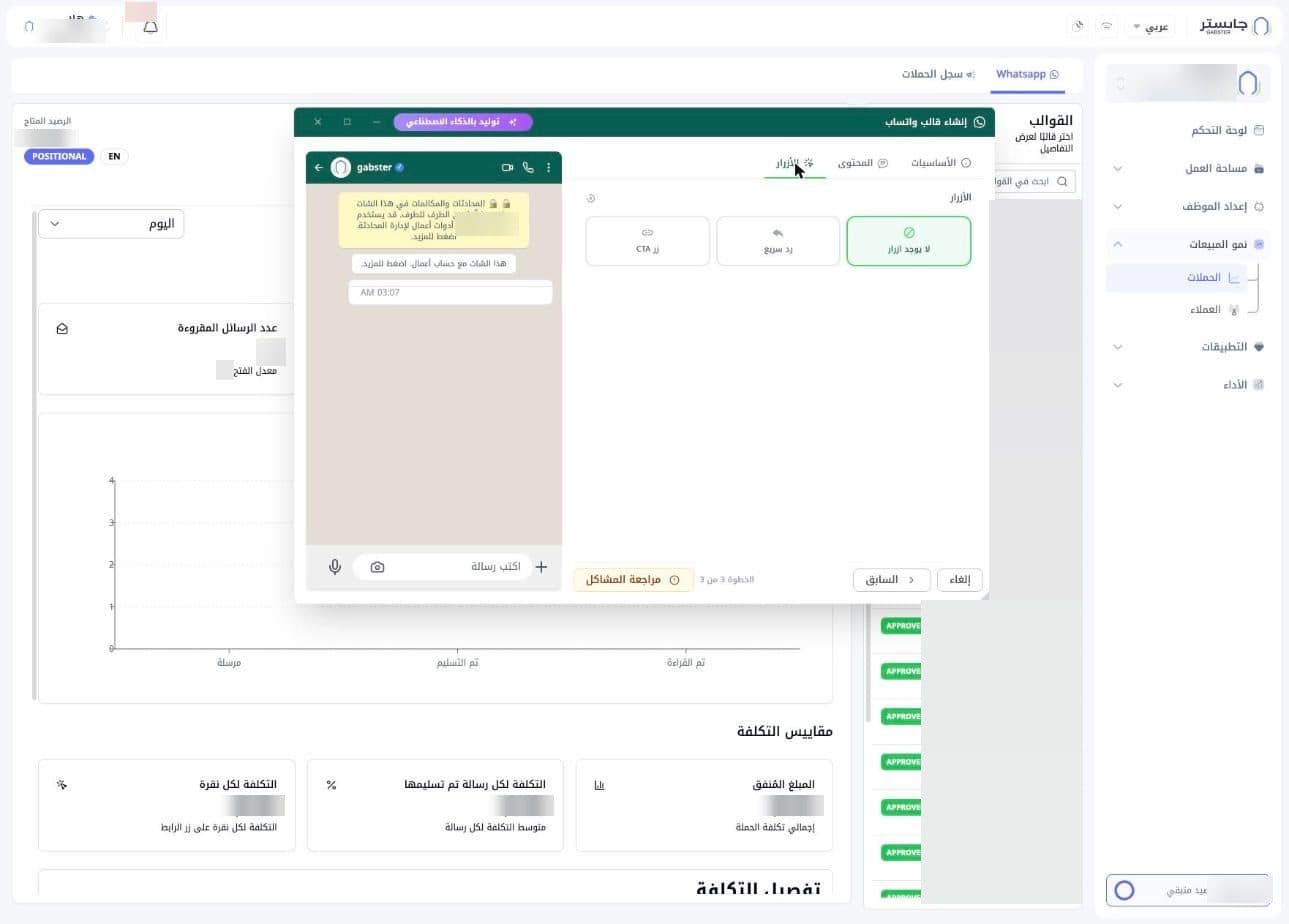
The footer holds Cancel (إلغاء) and, on steps 2 and 3, Back (السابق). While required fields are still missing, the last step shows Review issues (مراجعة المشاكل) instead of Next.
Once nothing is missing, the button becomes Create template (إنشاء القالب). Creating sends the template to Meta for review and shows Template created successfully (تم إنشاء القالب بنجاح). The template starts as PENDING; Meta's approval or rejection shows only as its status badge in the template list, with no notification.
Statistics sub-tab
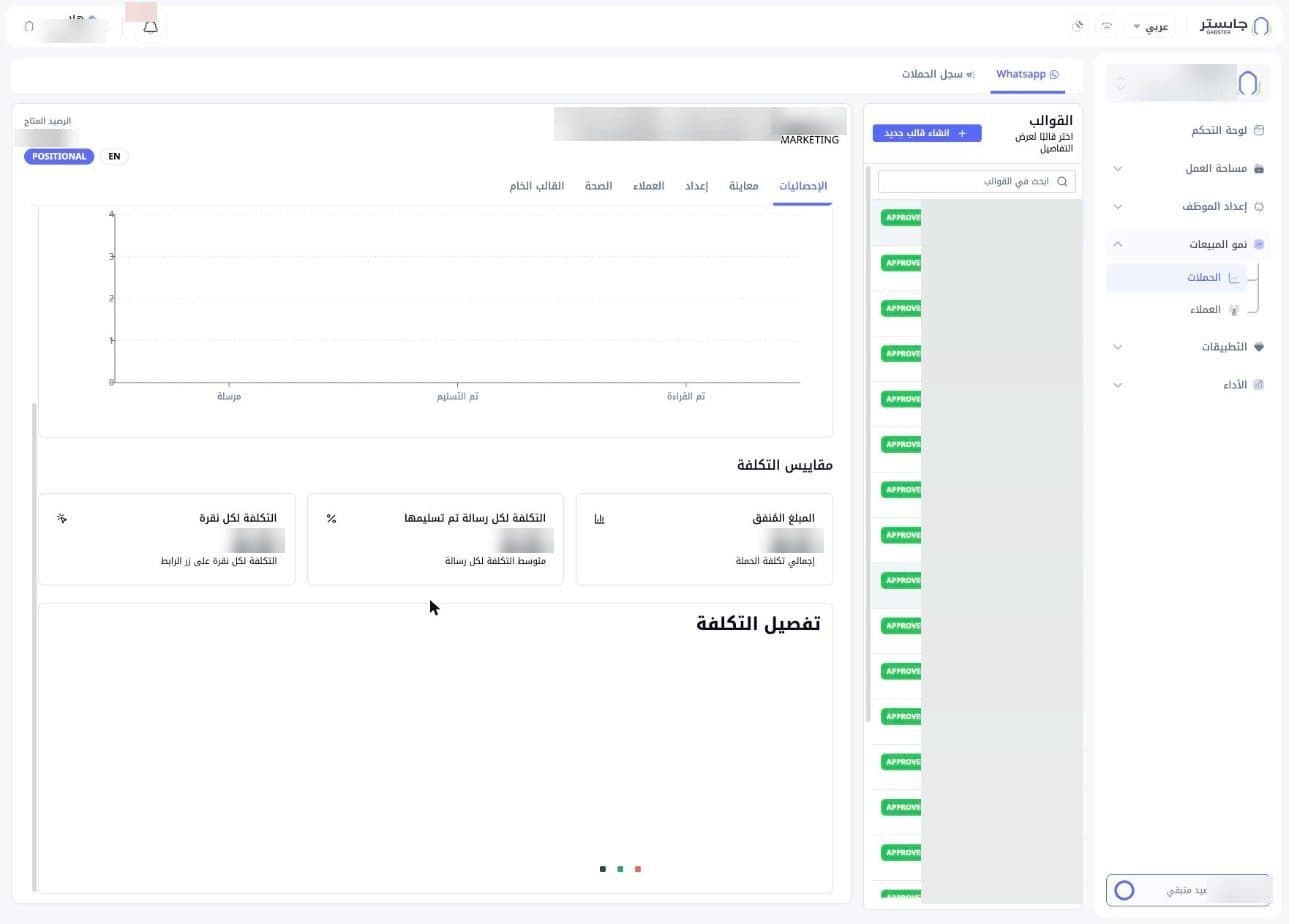
The Campaign statistics (إحصائيات الحملة) section shows results for the selected template, with its Template ID (معرف القالب). Choose the period from the dropdown (default Today (اليوم)).
Message metrics
| Card | What it shows |
|---|---|
| Messages sent (عدد الرسائل المرسلة) | Total messages sent |
| Messages delivered (عدد الرسائل التي تم تسليمها) | Delivered messages and the Delivery rate (معدل التسليم) |
| Messages read (عدد الرسائل المقروءة) | Read messages and the Open rate (معدل الفتح) |
Below the cards, the Message metrics (مقاييس الرسائل) chart compares Sent (مرسلة), Delivered (تم التسليم) and Read (تم القراءة).
Cost metrics
Scroll down to see Cost metrics (مقاييس التكلفة), in US dollars:
| Card | What it shows |
|---|---|
| Amount spent (المبلغ المُنفق) | Total campaign cost |
| Cost per delivered message (التكلفة لكل رسالة تم تسليمها) | Average cost per message |
| Cost per click (التكلفة لكل نقرة) | Cost per click on the link button |
Below them is the Cost breakdown (تفصيل التكلفة) chart.
The chart's three colours are the same three cost lines as the cards above it: amount spent, cost per delivered message and cost per click.
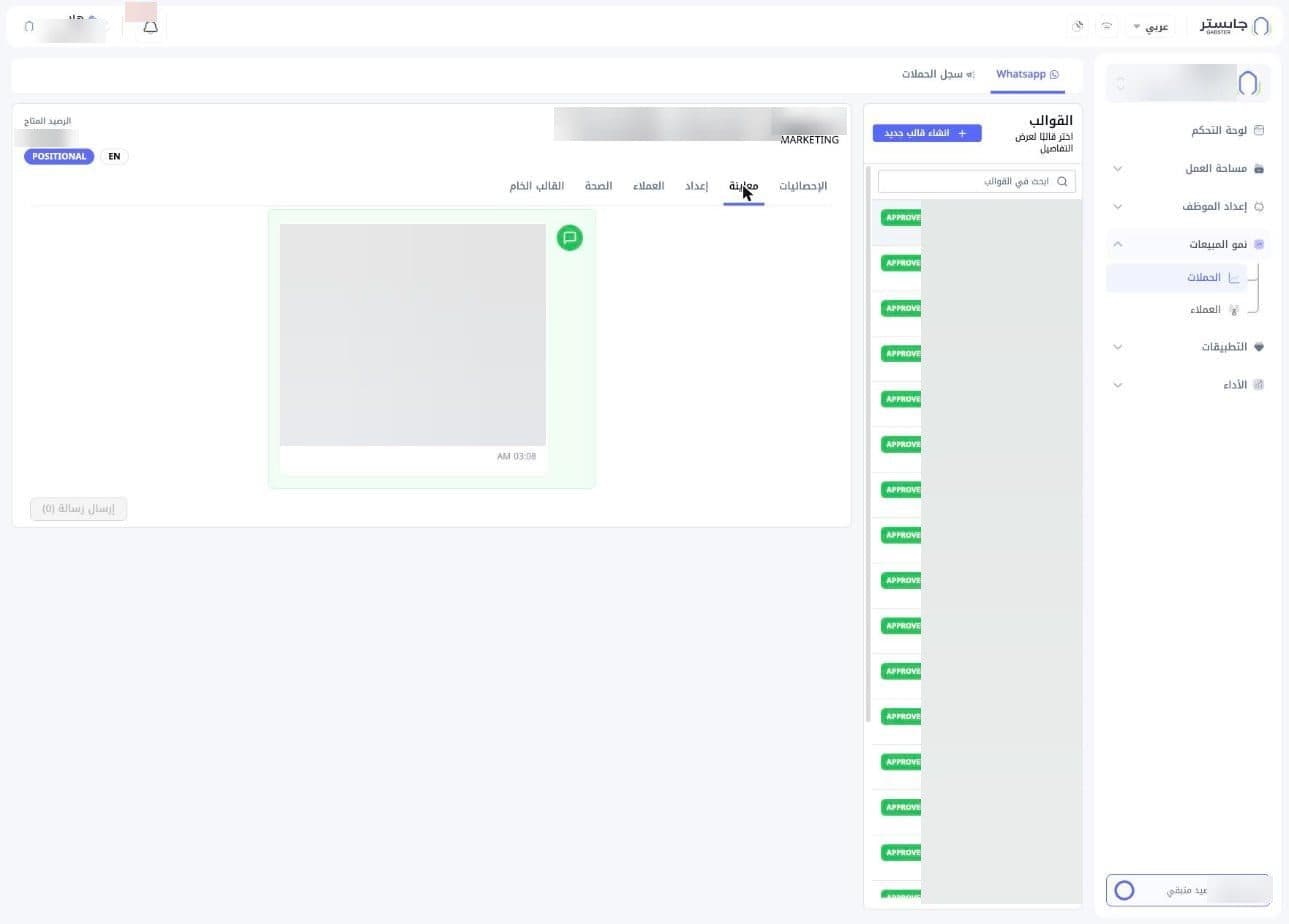
Preview sub-tab
Shows the template as it will look in a WhatsApp message, including its buttons. Variables appear as written (e.g. {{1}}), without values.
Send a campaign
You prepare a campaign on the Setup and Customers sub-tabs, then send it with the Send message (إرسال رسالة) button below the content. The button shows a number in brackets, e.g. Send message (0).
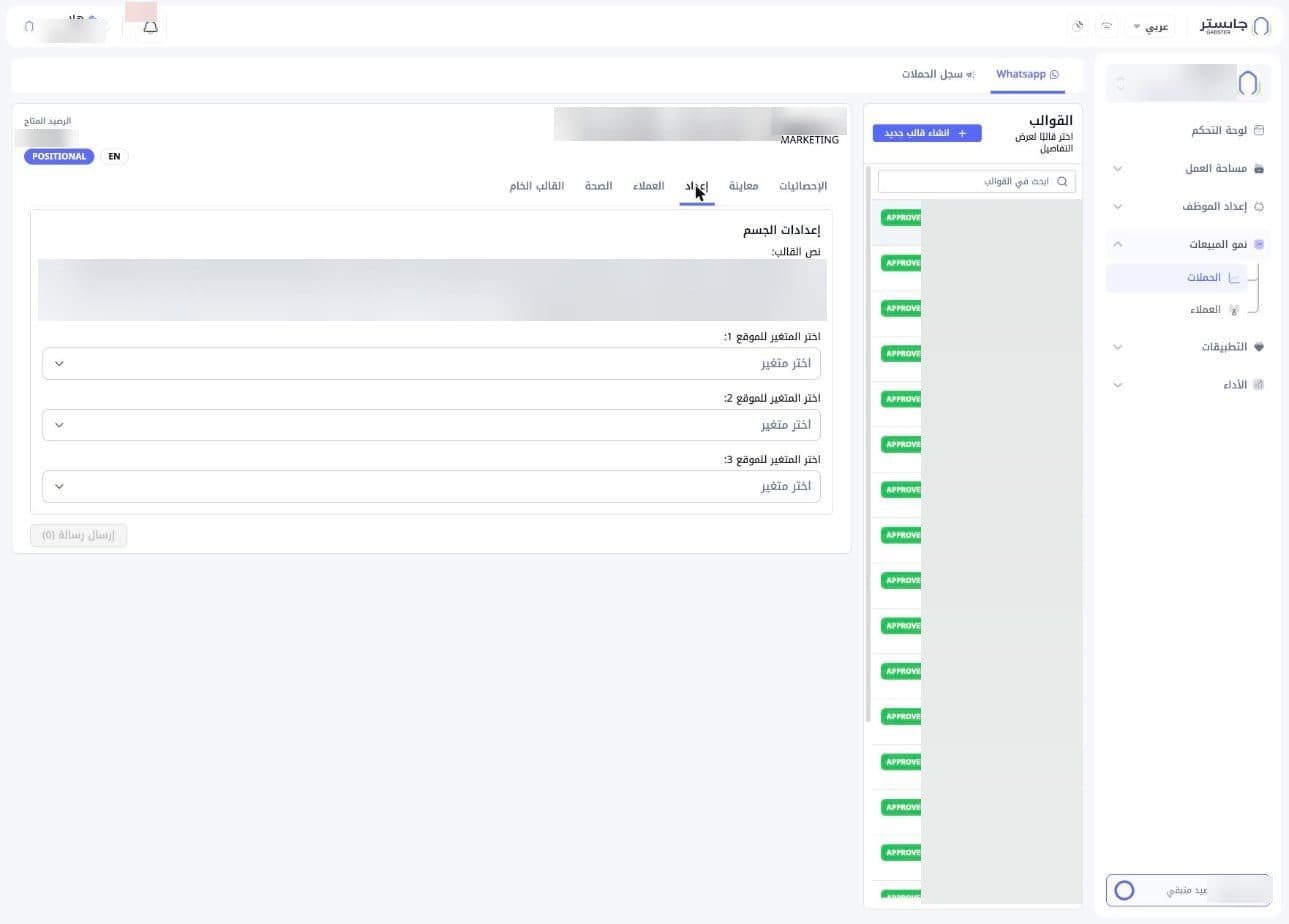
Setup
The Body settings (إعدادات الجسم) section shows the template text (read-only) and, below it, Choose the variable for position 1 (اختر المتغير للموقع 1) and so on, one dropdown per template variable. In each dropdown, pick the value that fills that variable.
Customers
Lists your project's customers so you can pick the campaign's recipients:
- Search customers (ابحث عن العملاء) to find a specific customer.
- The Choose tags (اختر التصنيفات) dropdown filters customers by tag, next to a Filters (الفلاتر) button.
- Tick the box of each customer you want to send to, or use the box in the table header.
- Columns: Name (الاسم), Email / Phone (البريد الإلكتروني / الهاتف), Tags (التصنيفات), Date (التاريخ).
Below the list you can move between pages and change the Rows per page (الصفوف في الصفحة, default 20).
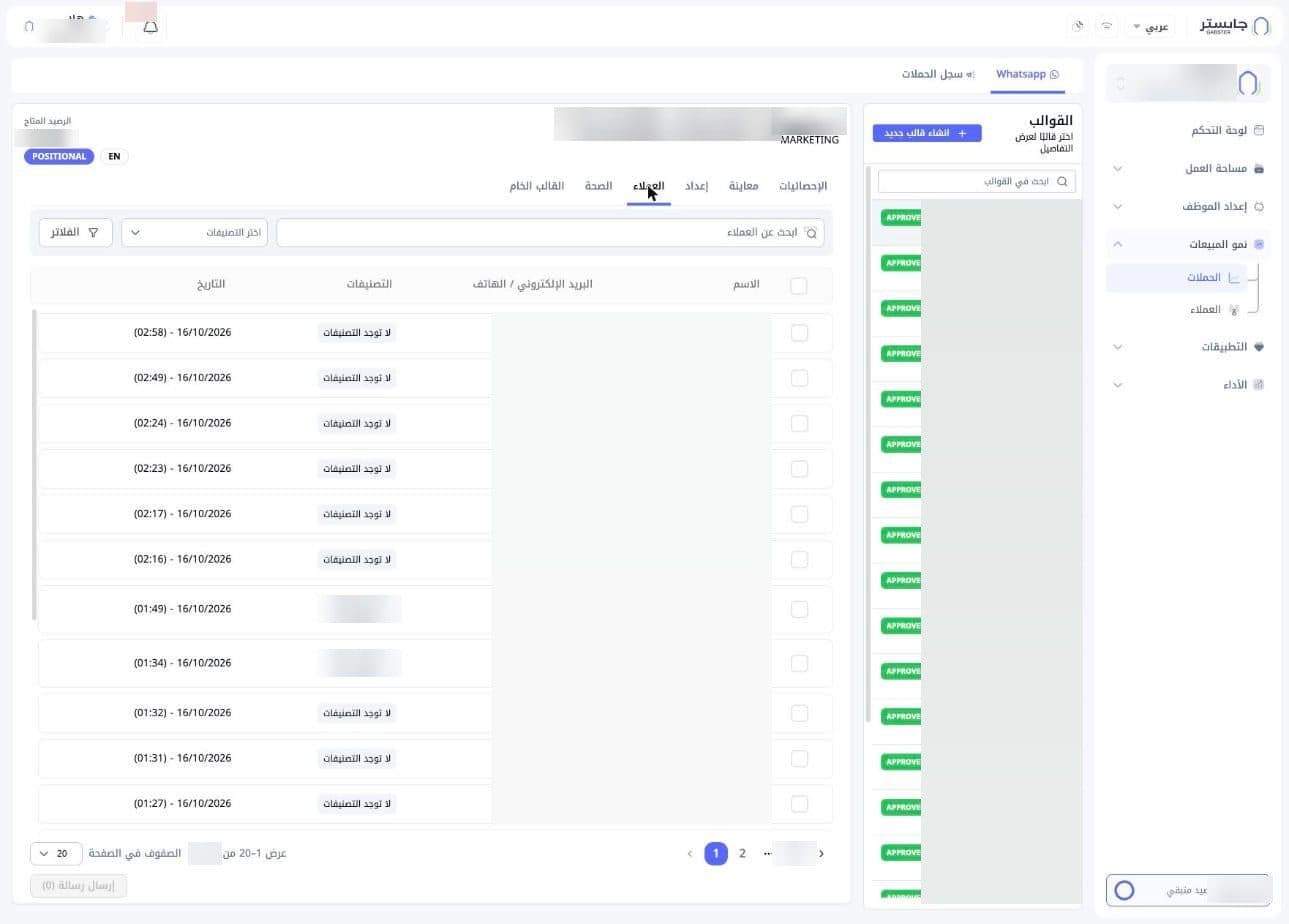
Check the Health sub-tab before you send, especially to a large number of recipients.
Health sub-tab
Collects what to check before sending:
- WhatsApp (META) alert: account status, quality and Meta tier, and the estimated number of unique recipients in the last 24 hours against the allowed limit.
- Campaign health (صحة الحملات) alert: whether sending from Gabster is allowed, and the campaign failure rate with advice to fix delivery problems before sending more.
- Summary badges: quality, status (e.g. Limited (محدود) or Available (متاح)) and Meta tier.
- Account health details (تفاصيل صحة الحساب): one card per connected asset, such as the phone number, the WhatsApp Business Account (حساب واتساب للأعمال), the Business portfolio (محفظة الأعمال) and the Meta app, each with its status and notes.
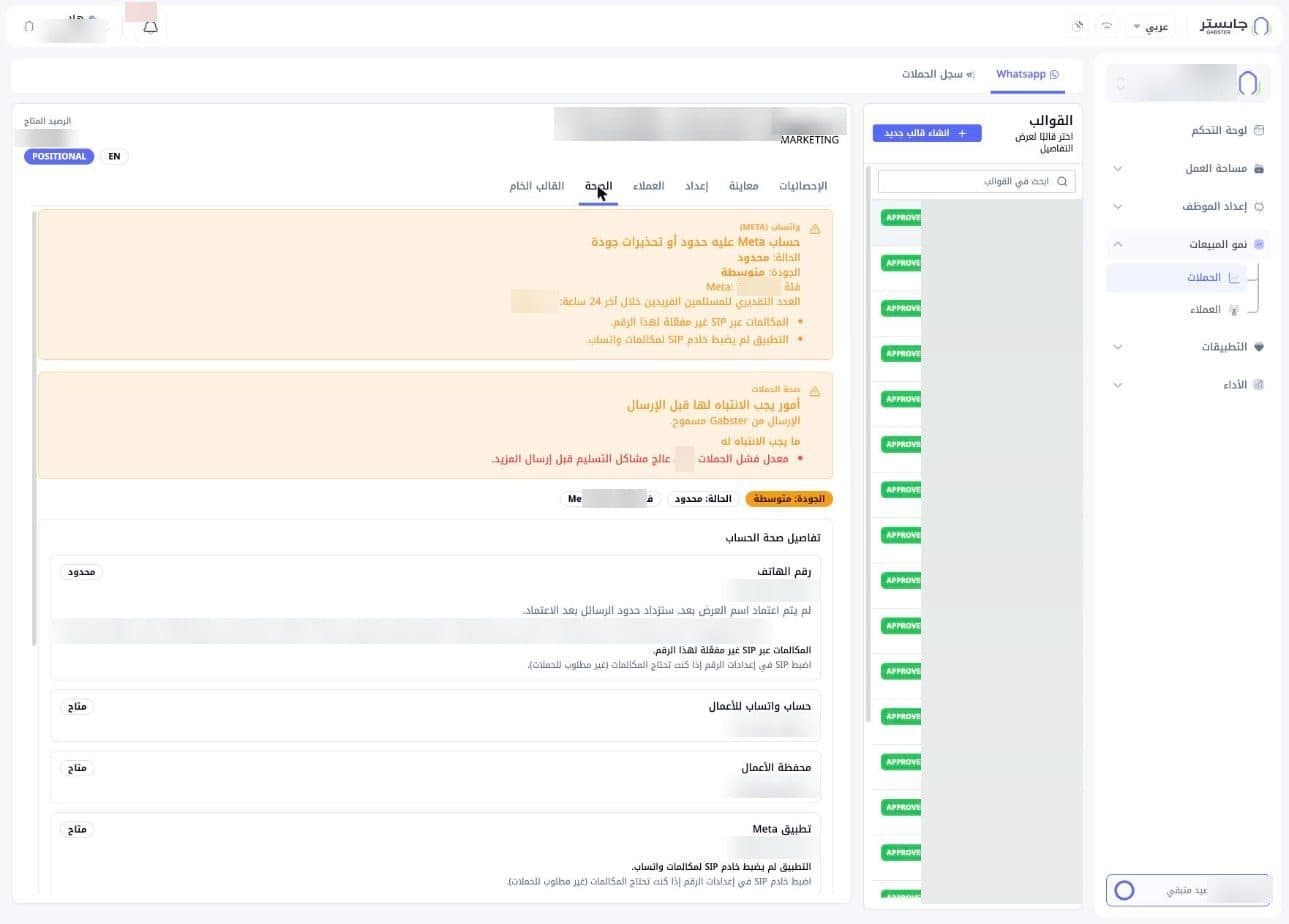
This sub-tab may show notes about WhatsApp calls over SIP. That setting is not needed to send campaigns.
Raw template sub-tab
Shows the template components as stored: a BODY card with the template text and Parameter examples (مثال للمعاملات), one example value per variable, and a BUTTONS card for the buttons.
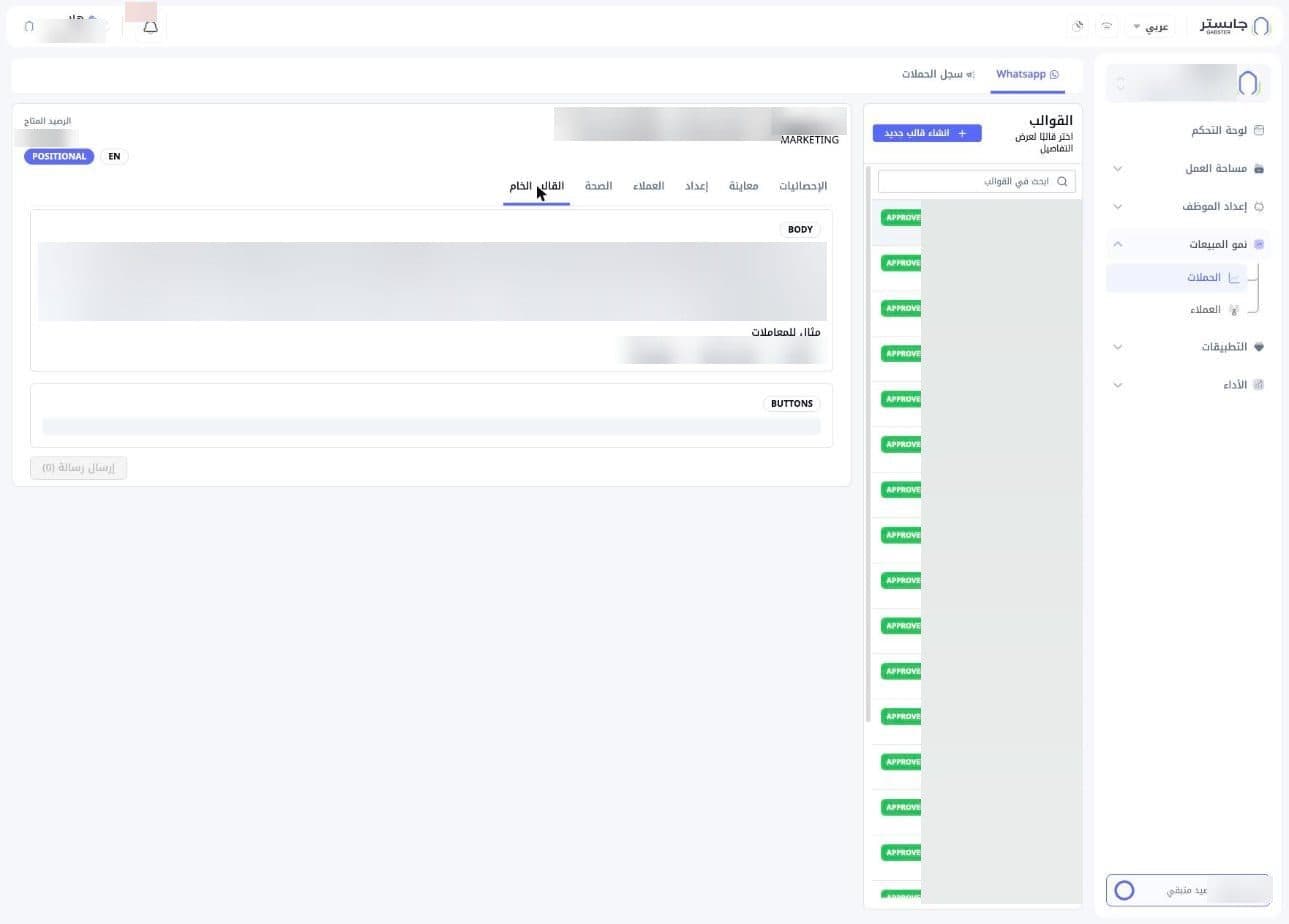
Campaign Log
Open the Campaign Log (سجل الحملات) tab to view past campaigns, newest first, 20 per page.
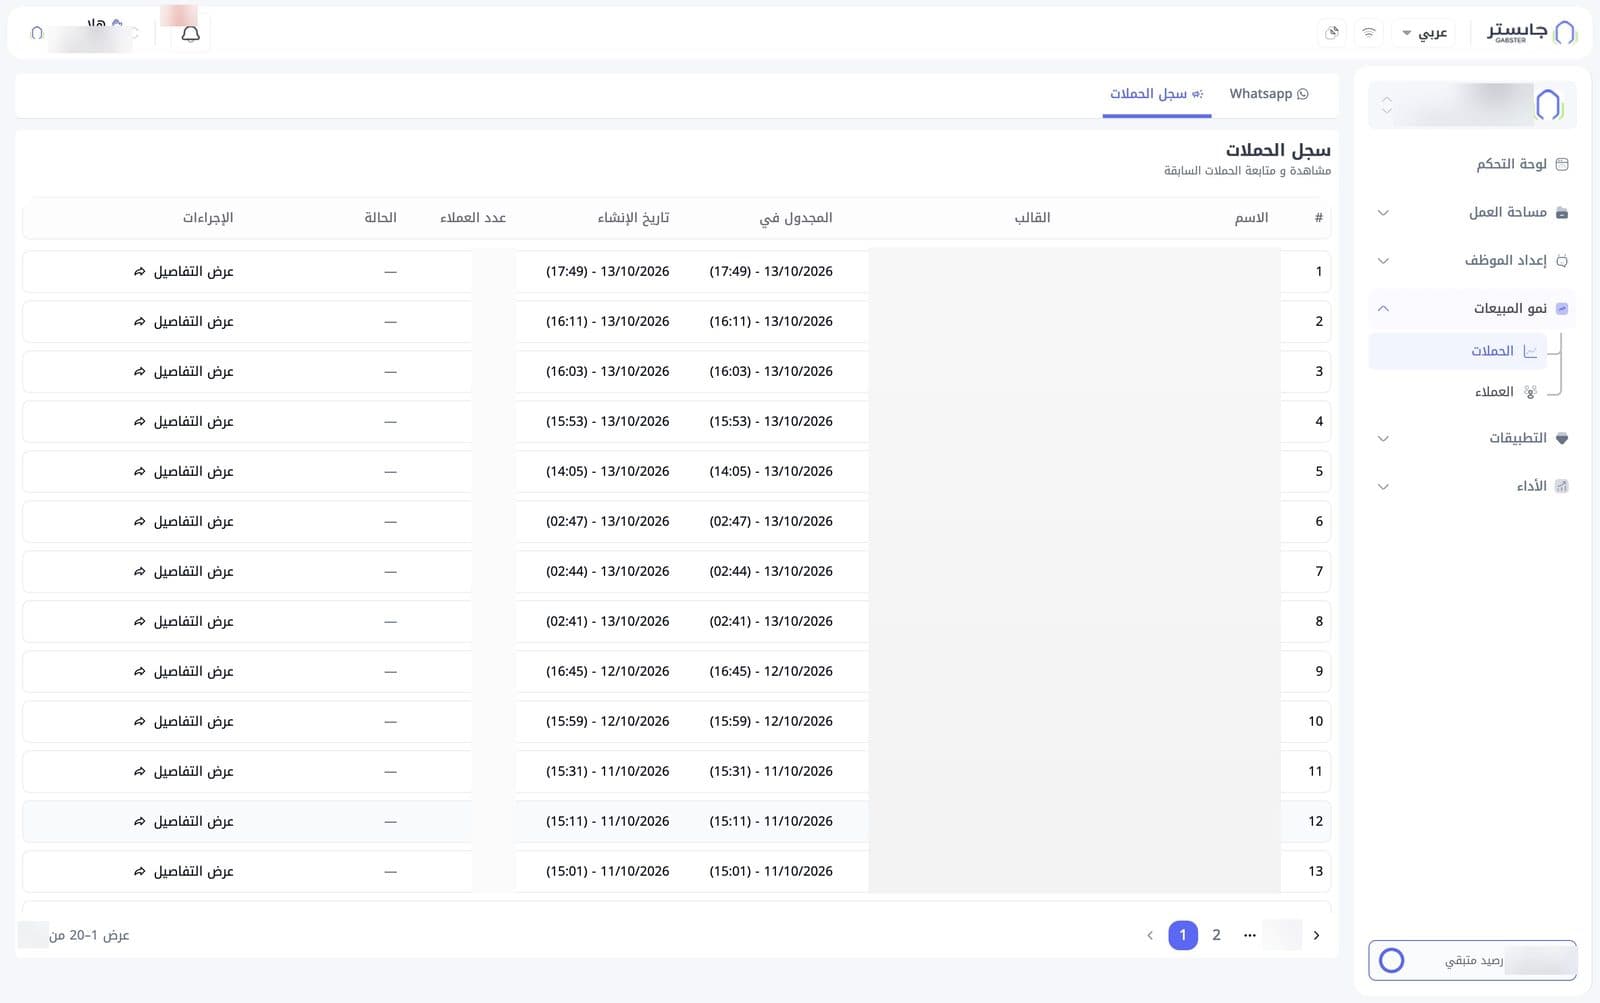
| Column | Meaning |
|---|---|
| # | Row number |
| Name (الاسم) | Campaign name |
| WhatsApp template (القالب) | The WhatsApp template used |
| Scheduled at (المجدول في) | When the campaign was created and sent |
| Created (تاريخ الإنشاء) | When the campaign was created |
| Number of customers (عدد العملاء) | Number of recipients |
| Status (الحالة) | Campaign status |
| Actions (الإجراءات) | The View details (عرض التفاصيل) link |
Campaigns you send from the dashboard go out straight away; there is no option to schedule them, so Scheduled at (المجدول في) shows when the campaign was created.
Campaign details
Click View details on a campaign row to open the Customer log (سجل العملاء) page, which lists the customers the campaign was sent to.
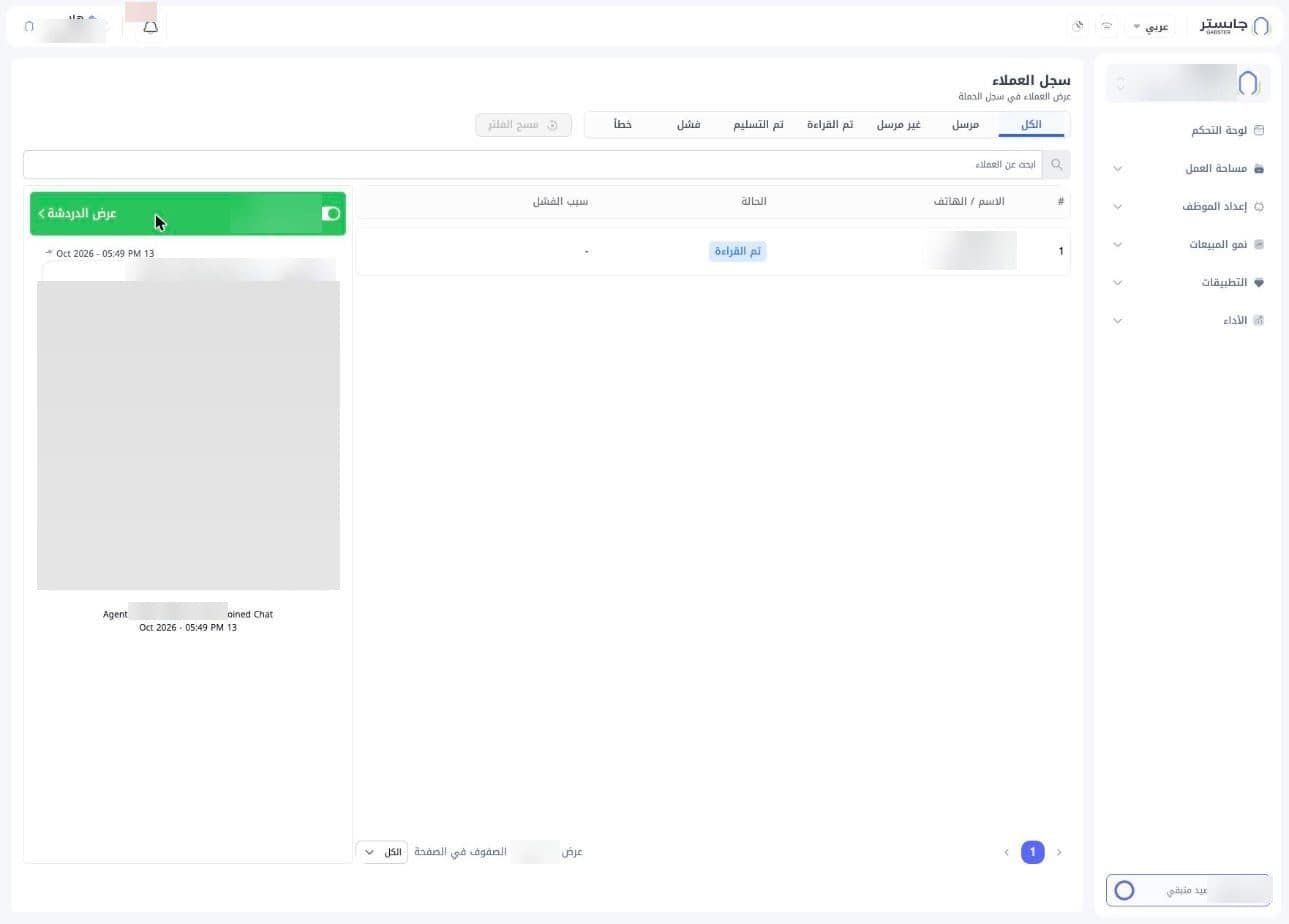
- Status tabs: All (الكل), Sent (مرسل), Not sent (غير مرسل), Read (تم القراءة), Delivered (تم التسليم), Failed (فشل), Error (خطأ). All is selected by default and shows every recipient. Next to the tabs is Clear filter (مسح الفلتر), greyed out while All is selected. Failed (فشل) means the message was not delivered; the reason shows under Failure reason (سبب الفشل). Error (خطأ) is an older status that appears only on older campaigns.
- Search customers (ابحث عن العملاء): find a specific recipient.
- Table: for each recipient, Name / Phone (الاسم / الهاتف), Status (الحالة) and Failure reason (سبب الفشل) when the message did not go through.
- Chat panel: on the left, the customer's conversation with their name and number, a Chat view (عرض الدردشة) link, and a toggle in the panel header.
Below the table you can move between pages and change the Rows per page (الصفوف في الصفحة, default All (الكل)).
The page shows neither the campaign name nor a back button. To return to the Campaign Log, open Campaigns from the sidebar, then the Campaign Log tab.